![]() New page is up, it’s my personal Linux Cheat Sheet, with somewhat of a bias towards audio streamers : https://www.dimdim.gr/linux-cheat-sheet/
New page is up, it’s my personal Linux Cheat Sheet, with somewhat of a bias towards audio streamers : https://www.dimdim.gr/linux-cheat-sheet/

![]() New page is up, it’s my personal Linux Cheat Sheet, with somewhat of a bias towards audio streamers : https://www.dimdim.gr/linux-cheat-sheet/
New page is up, it’s my personal Linux Cheat Sheet, with somewhat of a bias towards audio streamers : https://www.dimdim.gr/linux-cheat-sheet/
Archphile used to be the RPi audio distribution of choice for the most hard-core RPi-lovin’ audiophiles around until last June when Michael (tuxx) decided to drop it.
Then in January he hinted to it coming back at some point.
Well, it appears that that moment has come. Head over here for more: https://archphile.org/blog/archphile-119-codename-corona-for-rpi23-and-odroid-c2-is-up/
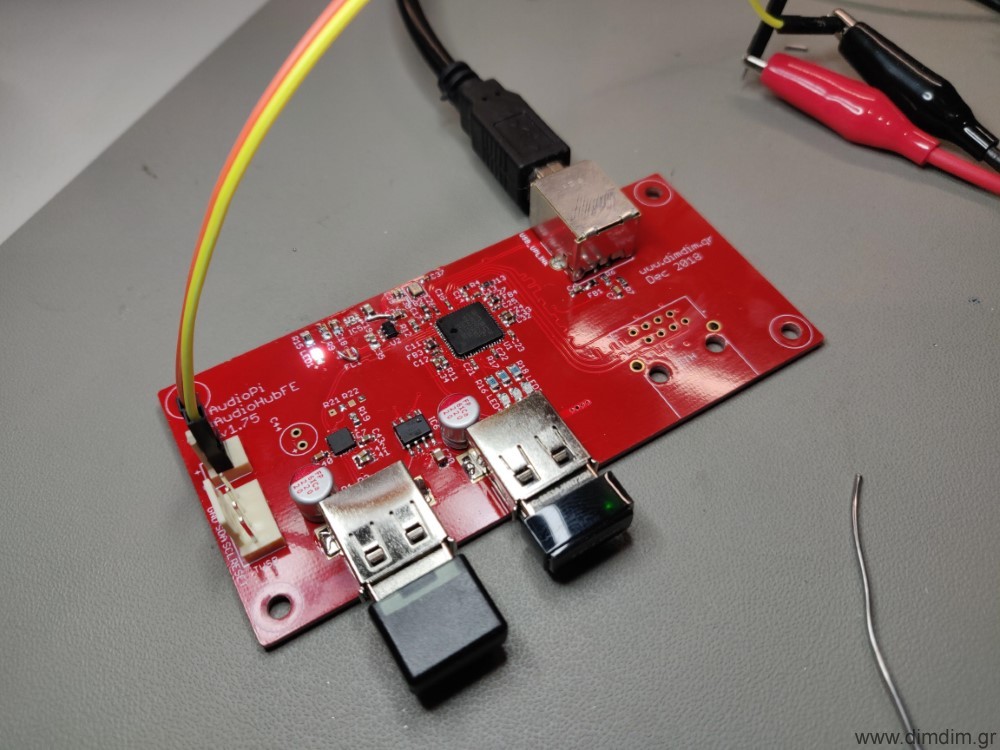
And not a moment too soon.. My Audio Pi is pretty much ready and it is in desperate need of a proper audio distribution. This should be interesting.
First off, I’m ashamed to admit that I had this little gem in my possession for about 2 years before I finally got the chance to put it through its paces.
After all, it’s just a s/pdif output device for a Raspberry Pi, right? I mean, it’s just s/pdif, how good could it be?
It turns out it can be pretty damned good! But I’m getting ahead of myself.. Let’s start at the beginning.
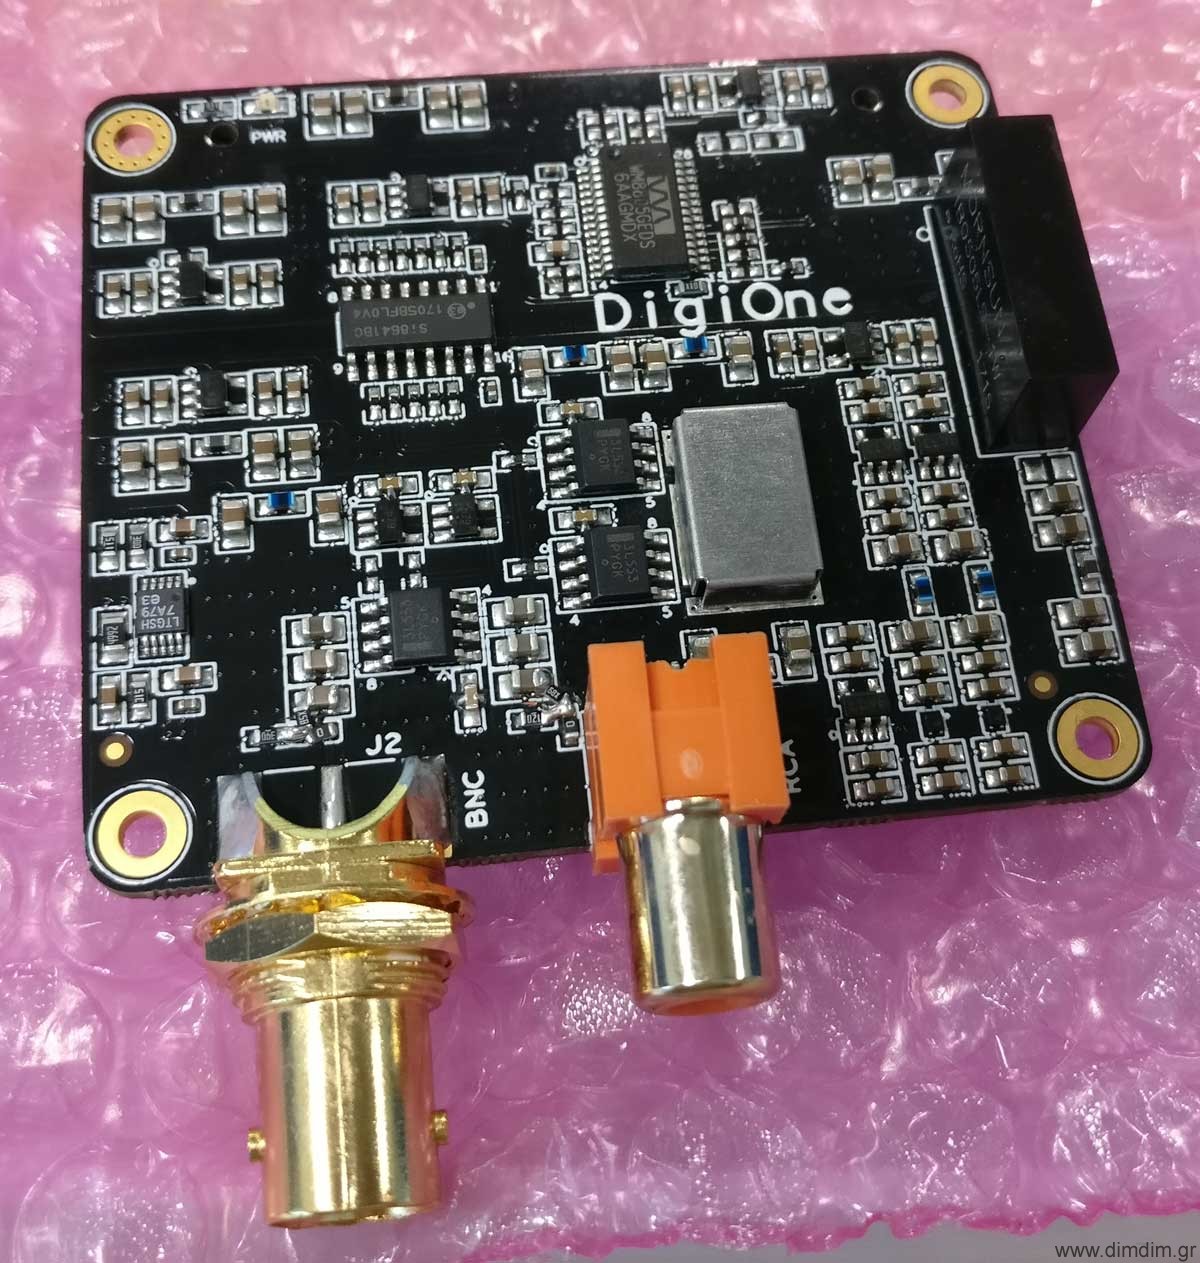
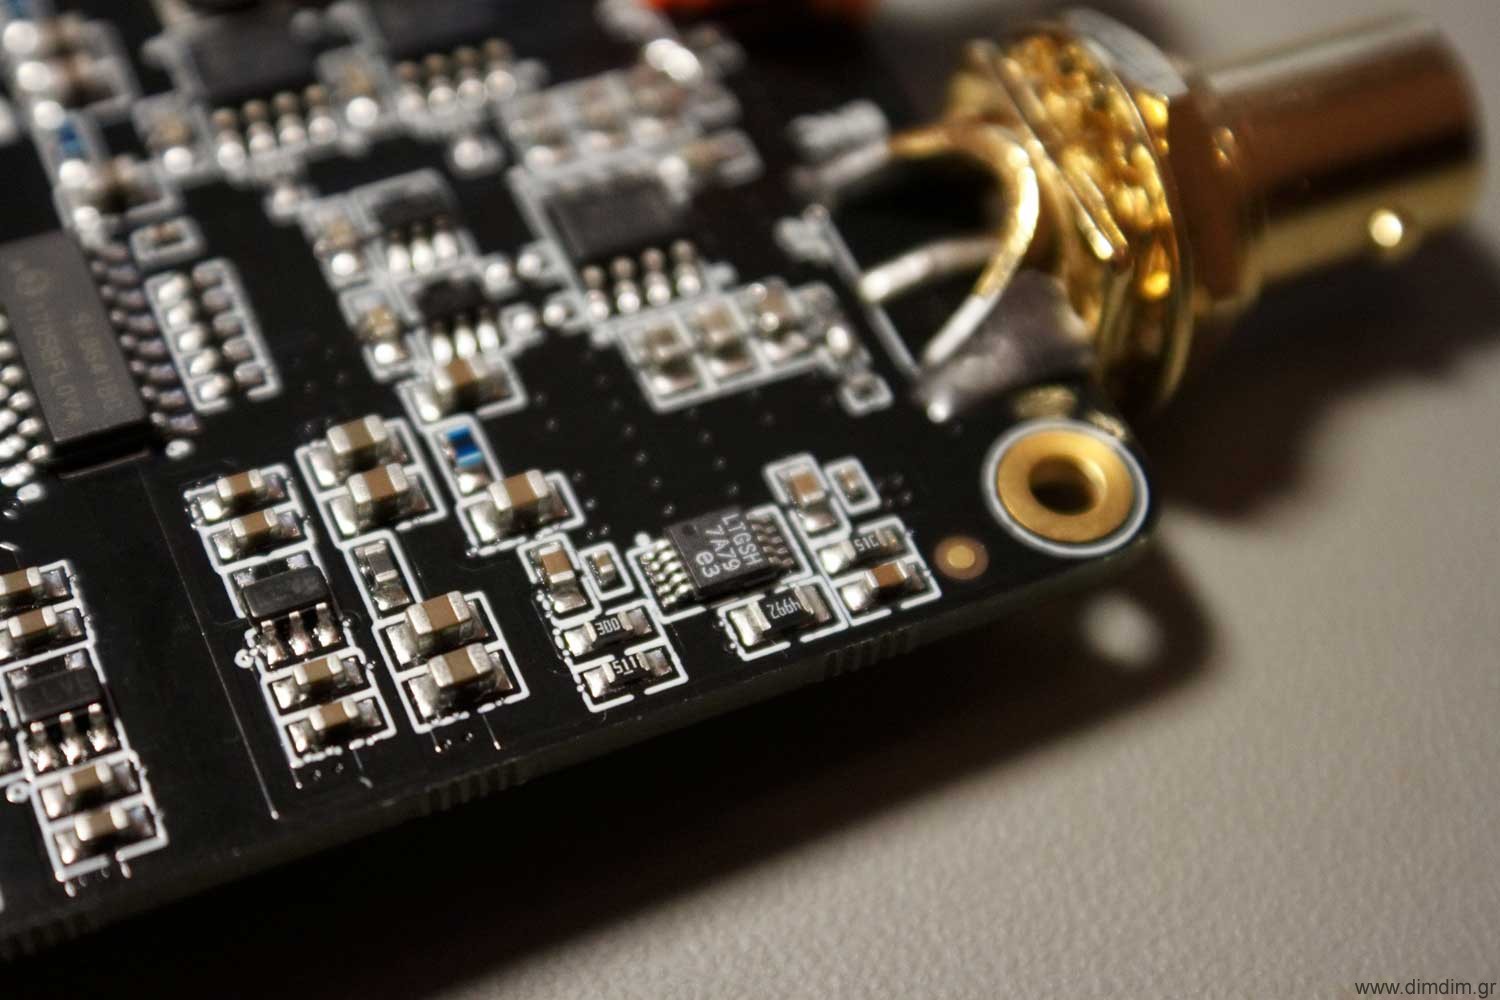
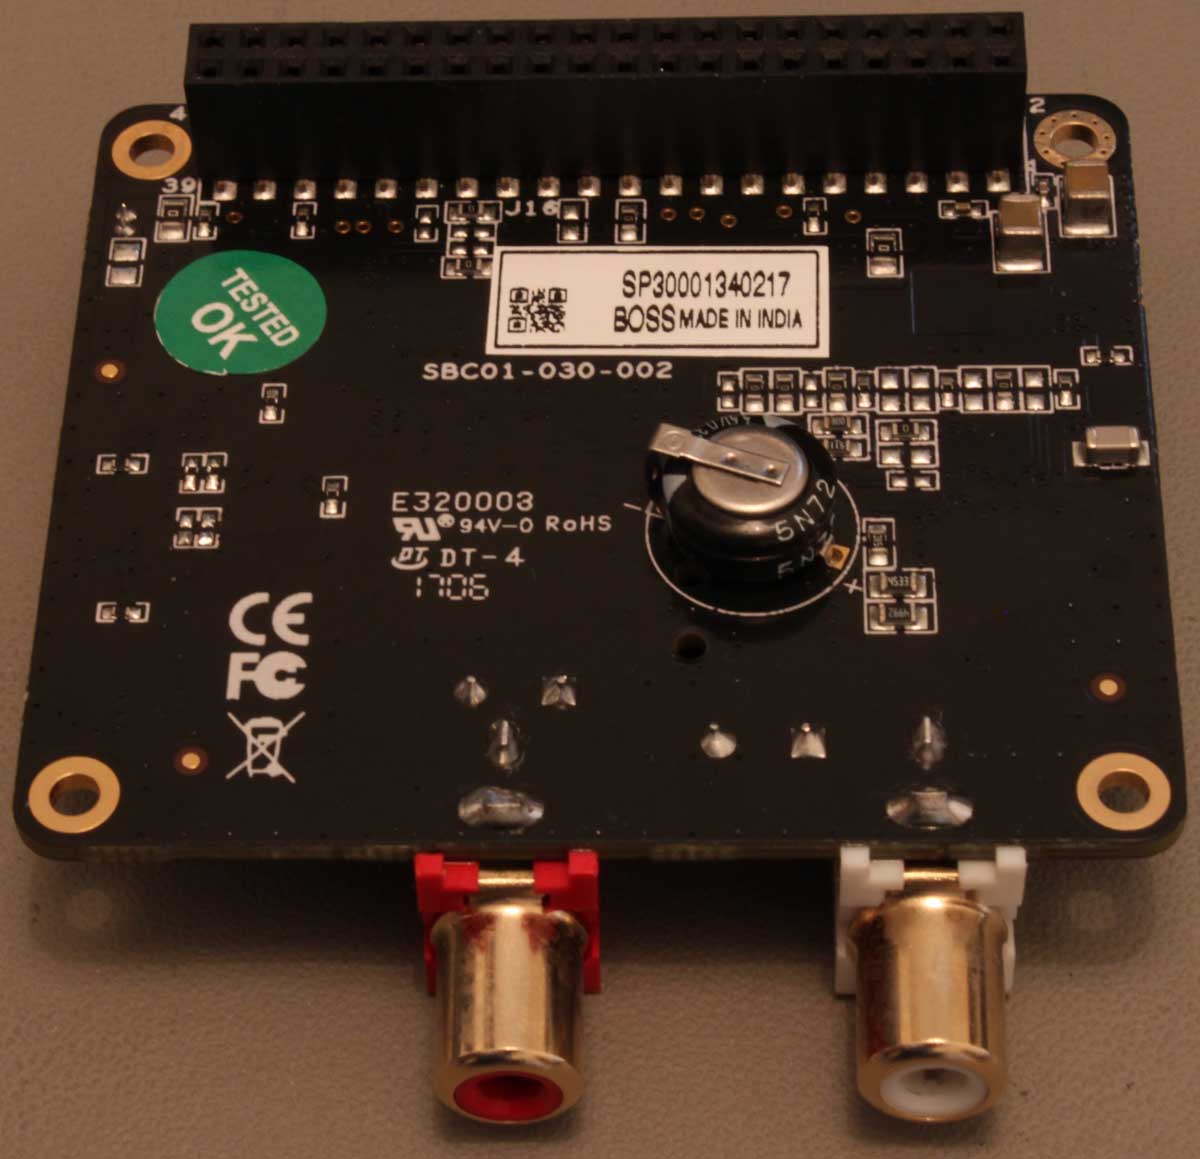
The DigiOne is a HAT compatible with most if not all RPis and supported by most if not all audio distributions. It is intended to be plugged-in directly on top of the RPi, with no need for an isolator HAT. Plus, it is designed to be powered by the RPi via the GPIO header, so no need (or provision) for an external power source.
The DigiOne utilizes a WM8805 to convert the RPi’s I2S signal into s/pdif. The WM8805 is run in master mode, so as to minimize jitter due to the RPi’s problematic I2S clocking scheme. The WM8805 is clocked by the same oscillators that are used to reclock the s/pdif signal.
The WM8805’s s/pdif output goes through an Si8641 150MHz galvanic isolator and is passed to the “clean” side of the board.
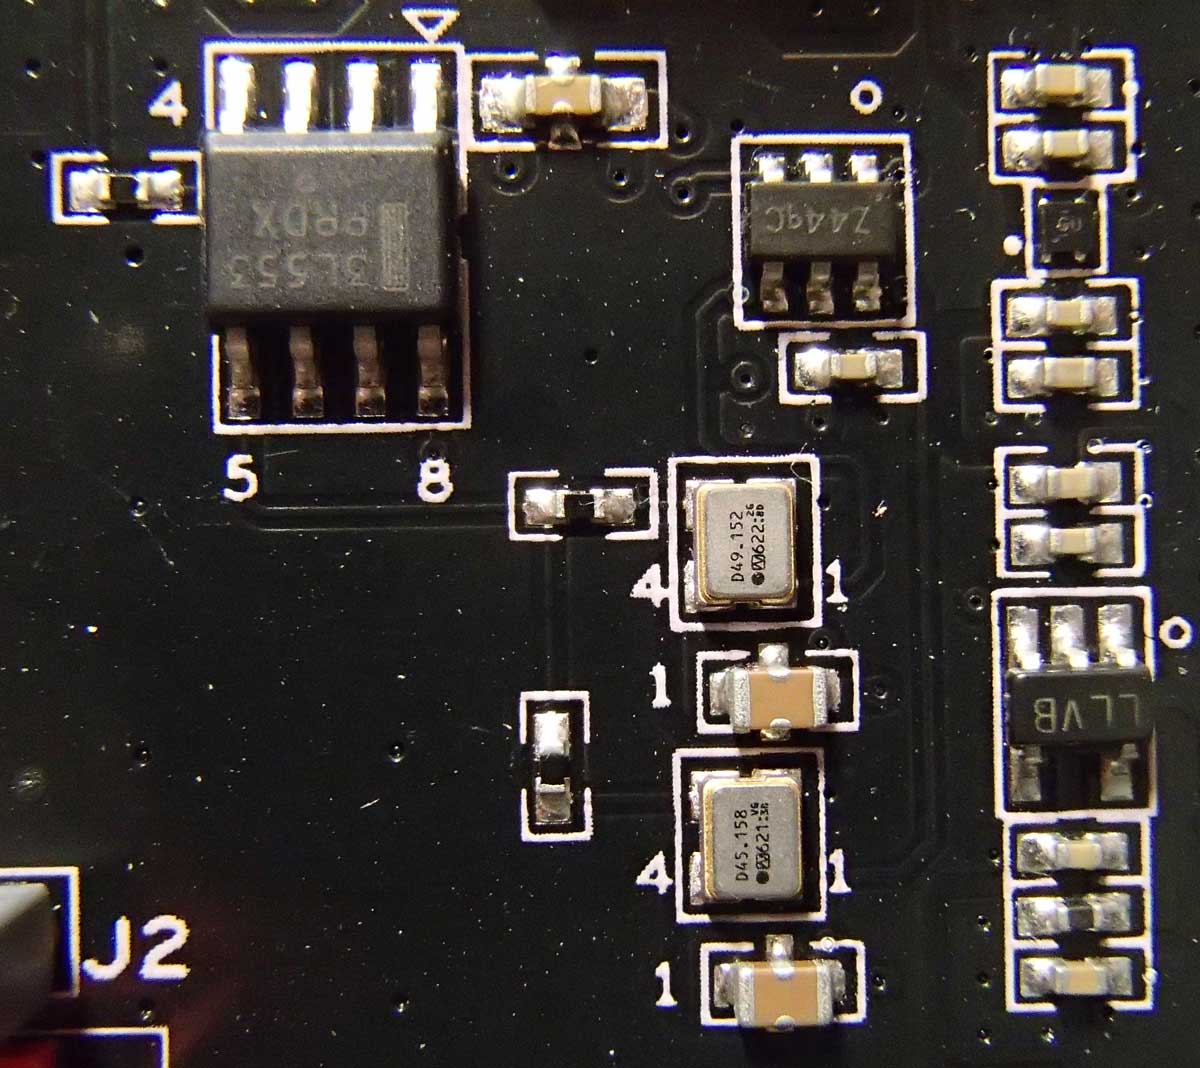
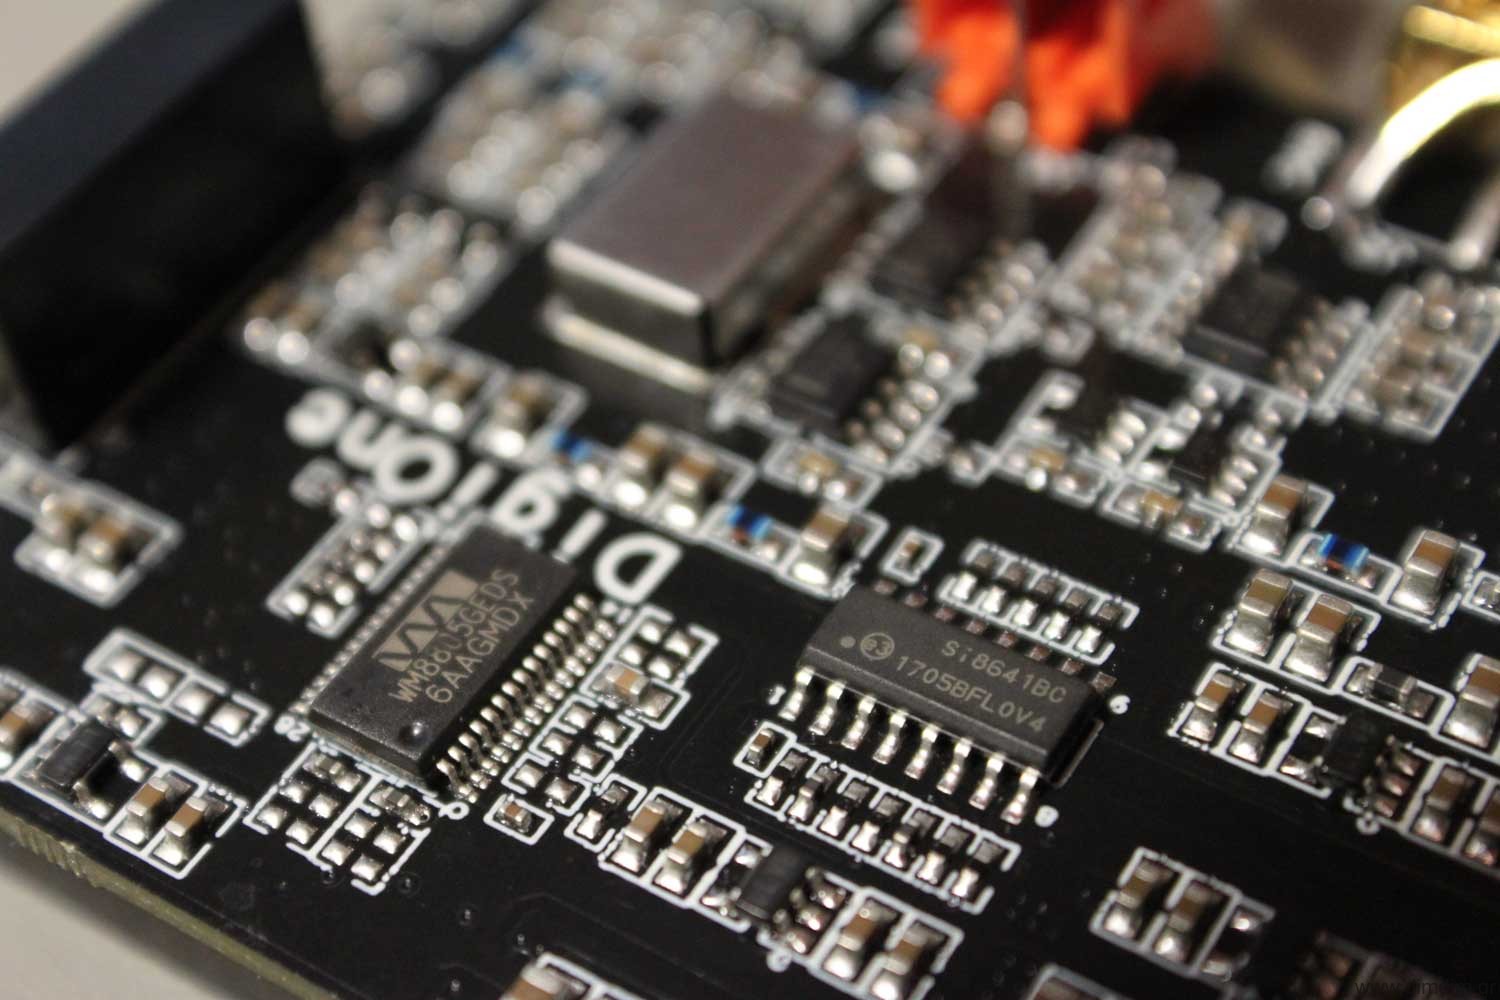 There the signal is reclocked by a high quality flip-flop clocked by high quality NDK oscillators (housed inside a metal box, used for shielding against EMI/RFI). There exist two oscillators, one for the 44.1K family and one for the 48K family of sampling rates. The output of the oscillators is put through NB3L553s for buffering and isolation.
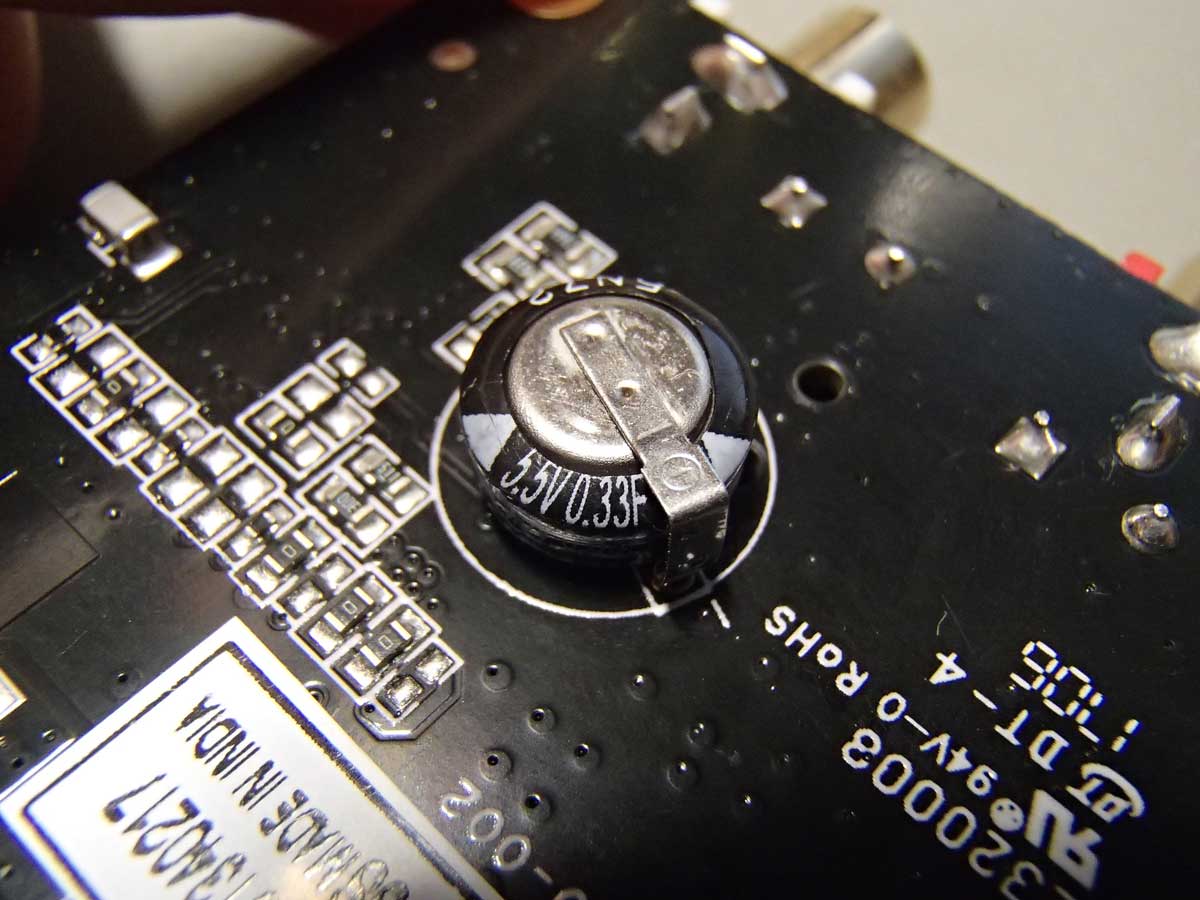
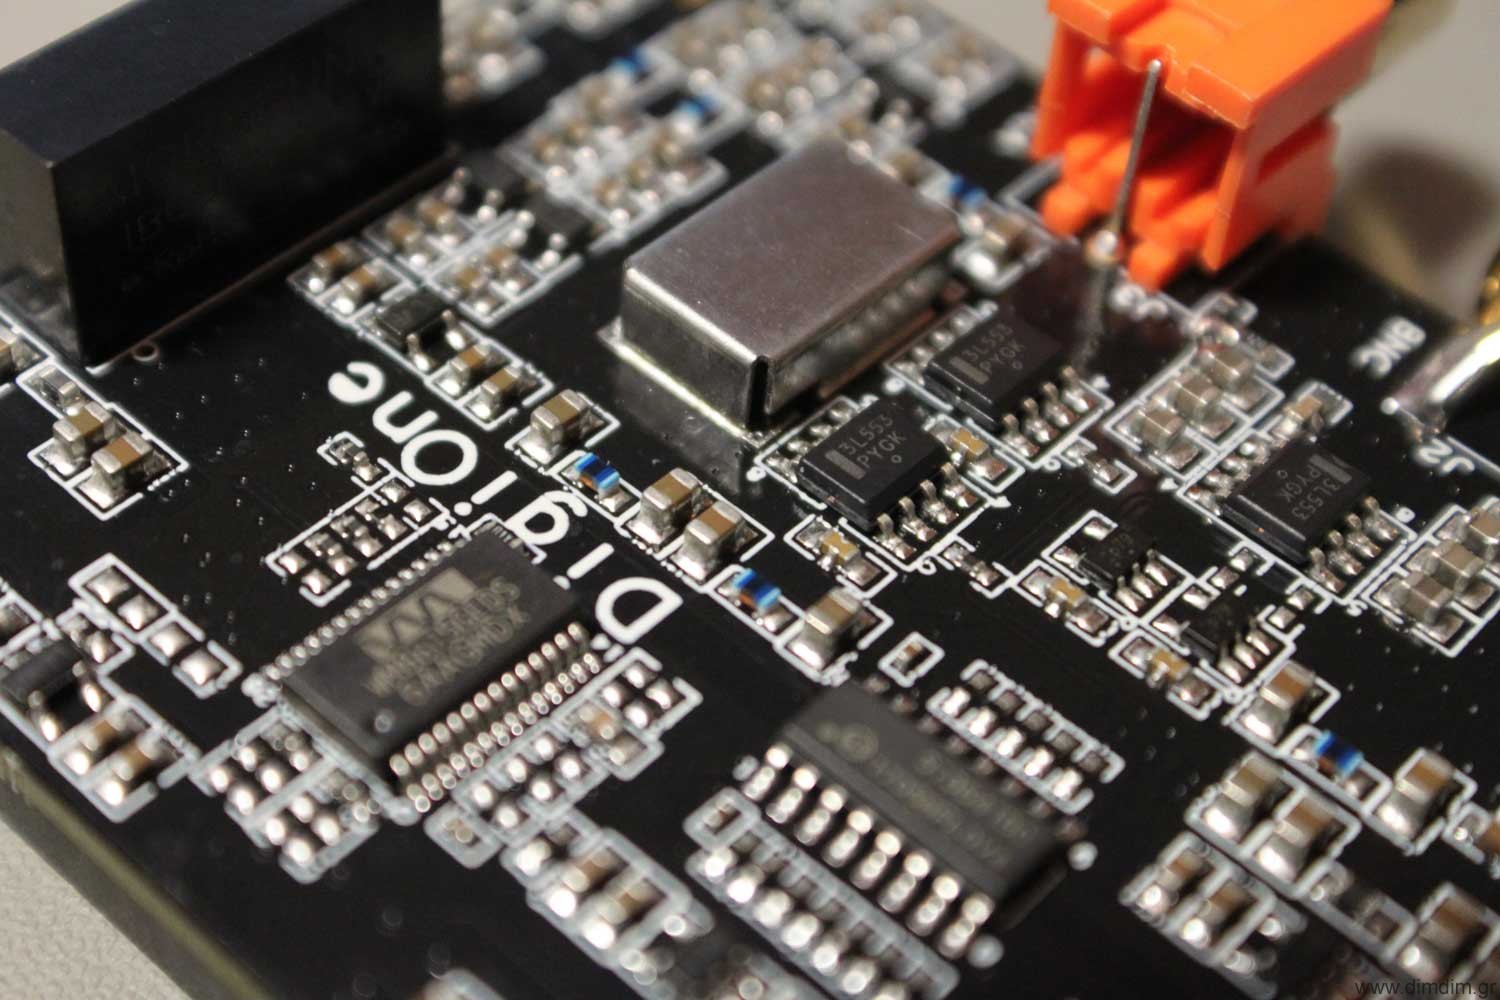 The entire isolated part of the board is powered by a DC-to-DC converter that offers galvanic isolation. Following this converter there exist a large number of LDO regulators and filter components. An LT3042 regulator is used to power one of the most critical parts of the circuit: the flip-flops that do the final reclocking.
 So, very solid engineering all around. But how well does it sound?
The answer is, surprisingly well for the money.
My RPi stack included an RPi 3 with the DigiOne, powered by Salas’ new L-Adapter power supply and running Archphile. The music was coming from my NAS. No audiophile ethernet switches were employed. 😛
Pitted against that I had my Logitech Squeezebox Touch running the EDO plugin for up to 192K s/pdif from its coax output and my relatively pricey Pioneer DV-LX50 Universal Player (using its coax s/pdif output).
The music used was Dire Straits’ SACD album (having selected its CD (and not SACD) layer) which was also accurately ripped to my NAS.
Output from the s/pdif transports went into an AK4118-based s/pdif receiver of my own design which in turn feeds my dual mono AK4493 DAC. The DAC’s output goes through a Salas DCG3 preamp into my Hypex amp.
First up was the Pioneer. It had been a while since I had listened to it through its s/pdif output so I was in for a bit of a shock. Its output sounded coarse, strained, tiring. For a moment I thought that it was due to the SACD’s mastering (the CD layers of SACDs are rumored to be mastered intentionally bad so as to give the impression that the SACD layers sound even better than they actually do), but that changed when I switched to the Squeezebox. Things got noticeably better, actually listenable. Not exactly close to what I had been accustomed to using the Squeezebox’s USB port, but closer.
Then I switched to the DigiOne. Wow! All of the “coldness” of the music was gone, the stage gained depth and width, the music became more detailed and lifelike. This was definitely a step up.
I would dare say that this s/pdif setup came in fact close in SQ to my USB setup. This was a very pleasant surprise.
Now I need to do some A-B testing between the DigiOne and the USB output of the RPi. So to-be-continued..
Not much free time these days so updates have been slow.. but I have a lot of interesting stuff cooking in the back burner.
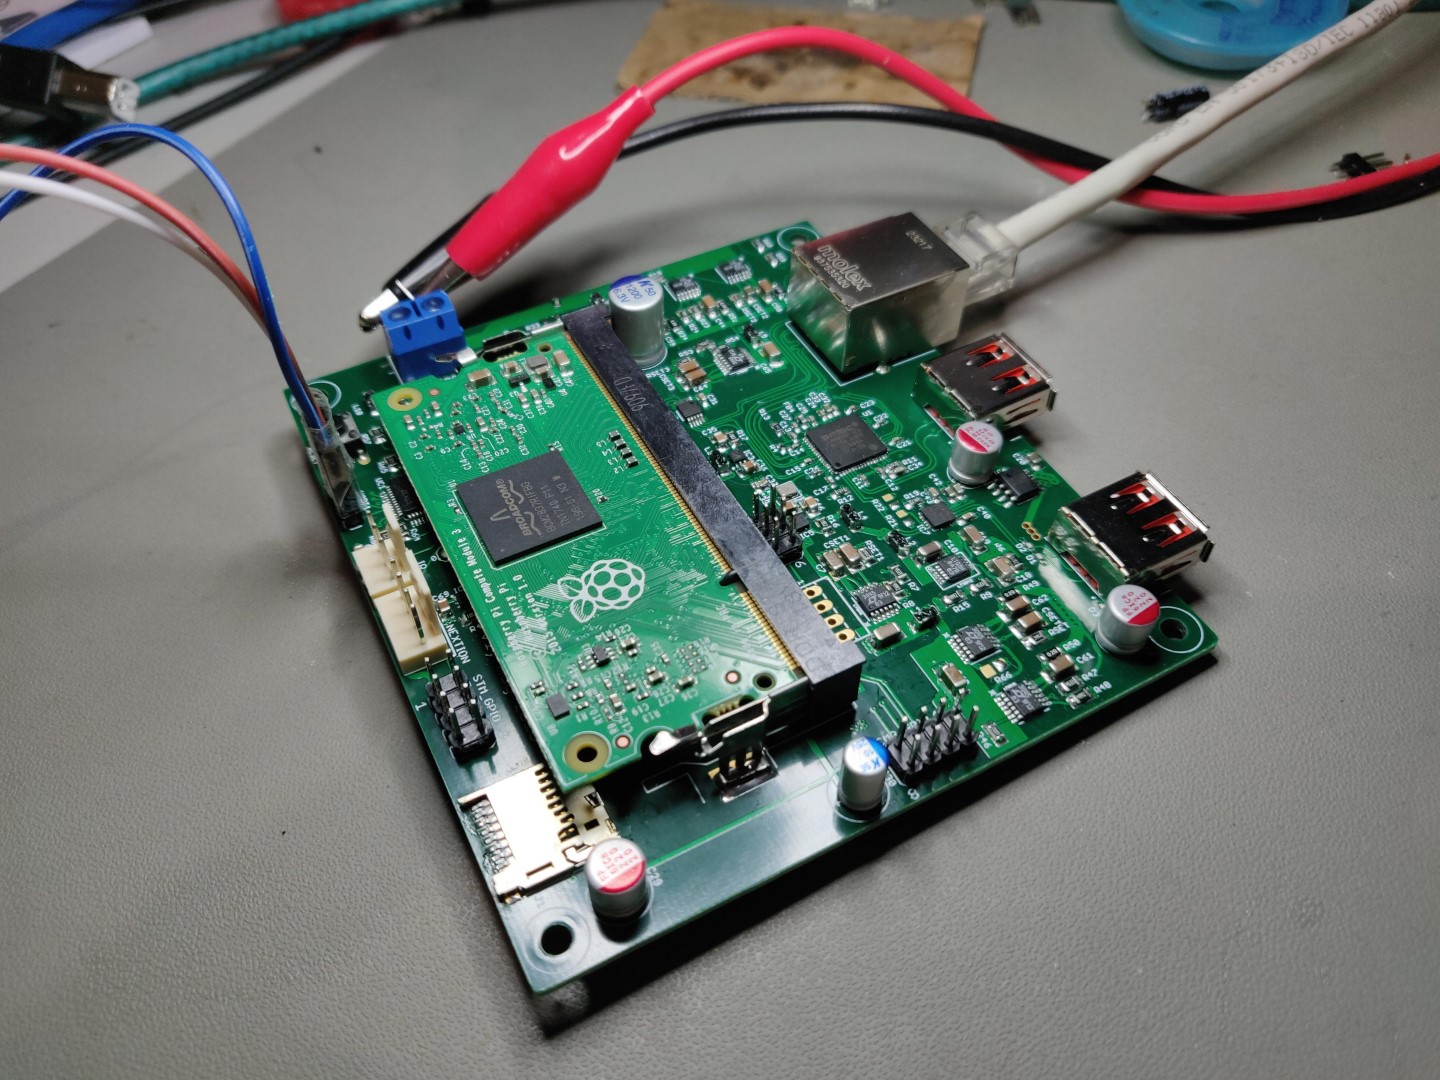
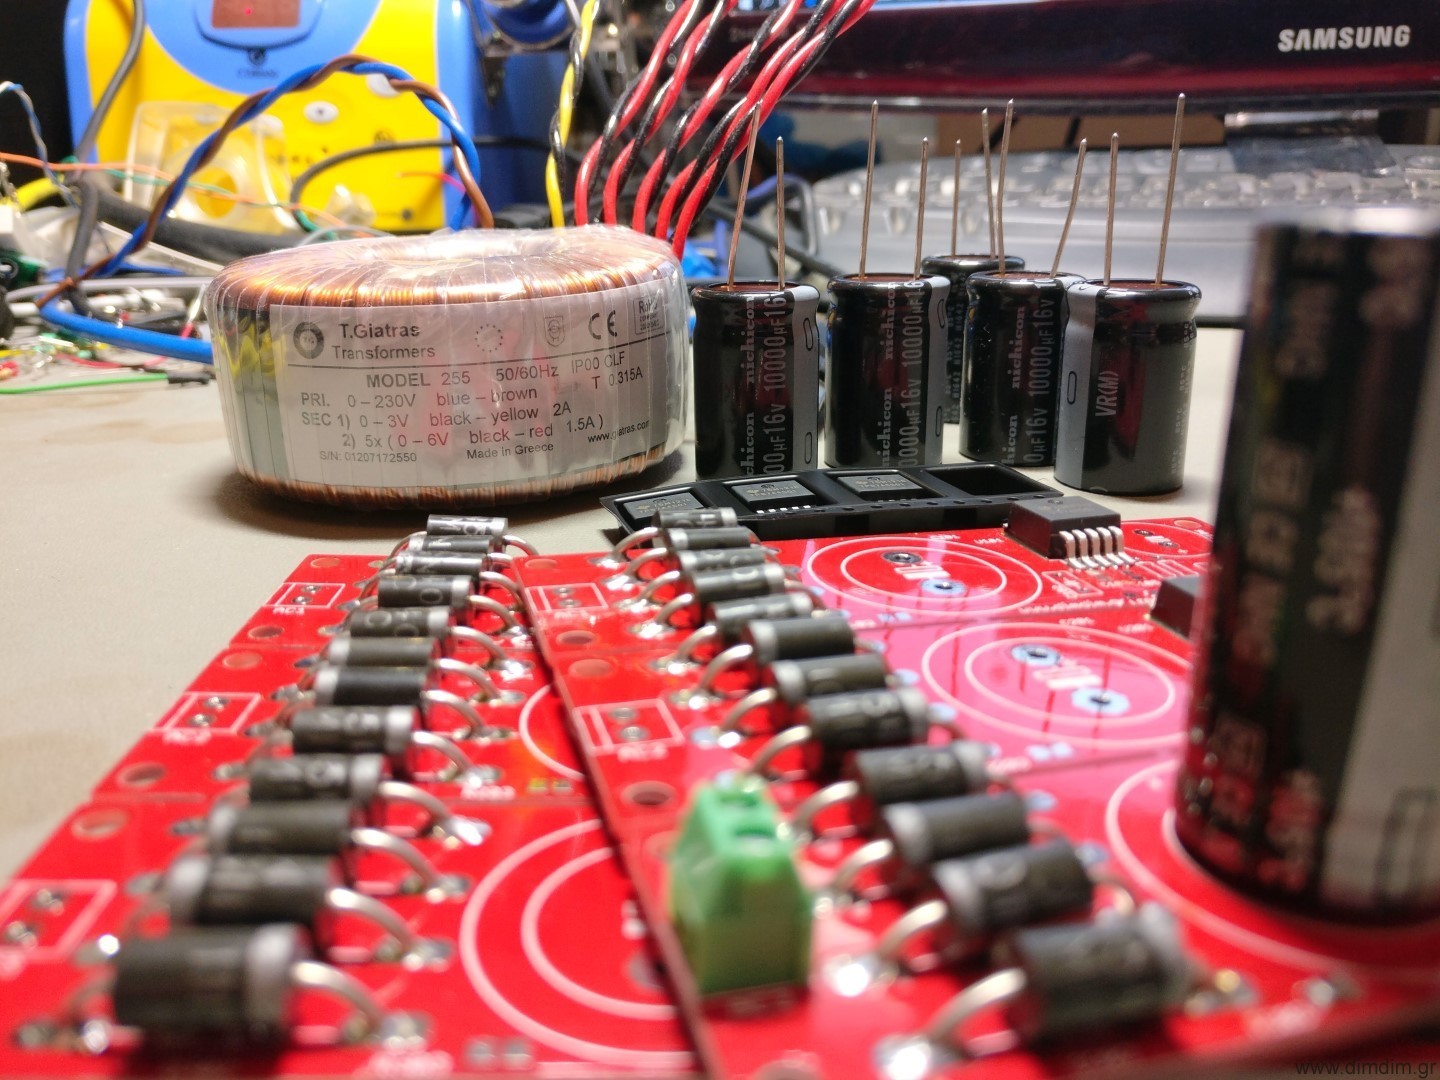
One of them is an audio grade RPi.
Essentially it will be a Compute Module 3 on a mainboard loaded with ultra low noise linear power supplies and some necessary peripherals.
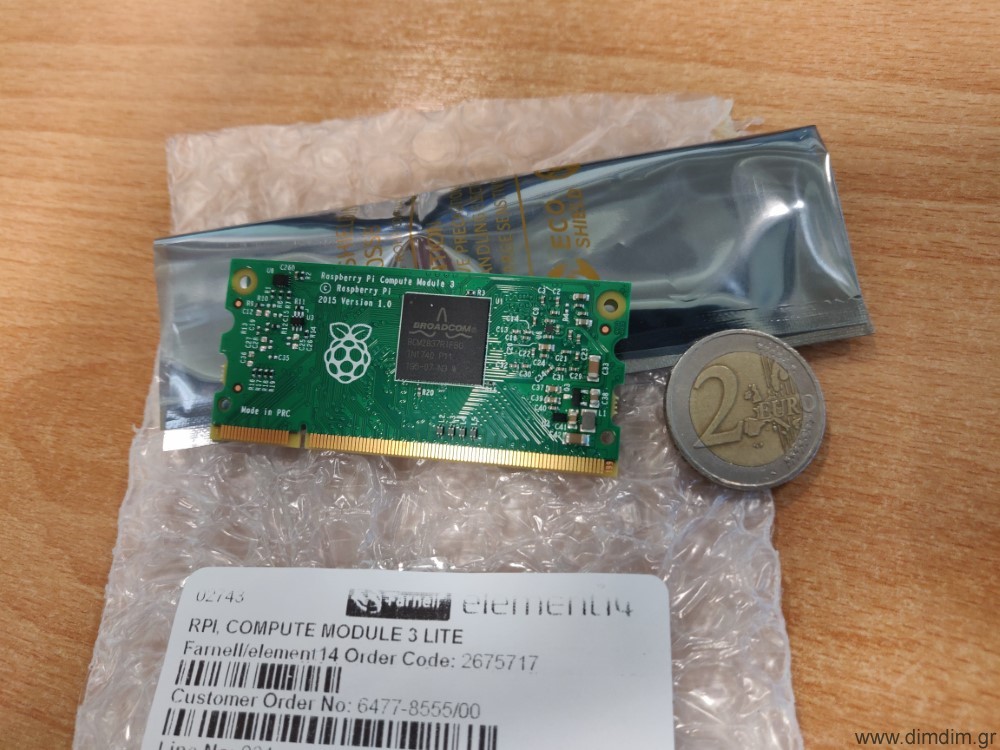
The idea came to me quite some time ago but it wasn’t until last November that I decided to actually go ahead with it.
The proof-of-concept PCBs for the mainboard were done by December.
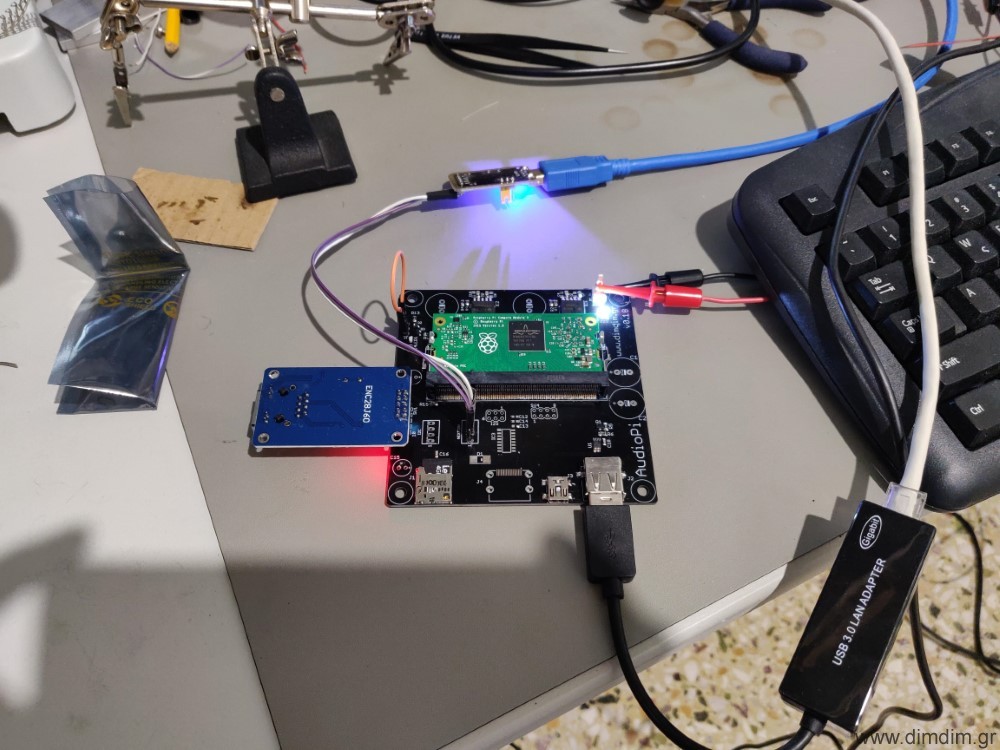
It appears that even the PoC board, with average quality power supplies, has a cleaner I2S output compared to a standard RPi3 powered by an equivalent linear power supply:
RPi 3:
Audio grade Pi:
The next part was the PoC board for the USB Hub & Ethernet controller. That took a bit more time and a 4-layer PCB with numerous 0402 sized components but it too ended up just fine (with the exception of a bad RJ45 footprint..).
So now I have a fully functioning set of boards with average quality power supplies that already performs better than my Squeezebox Touch as a USB transport.
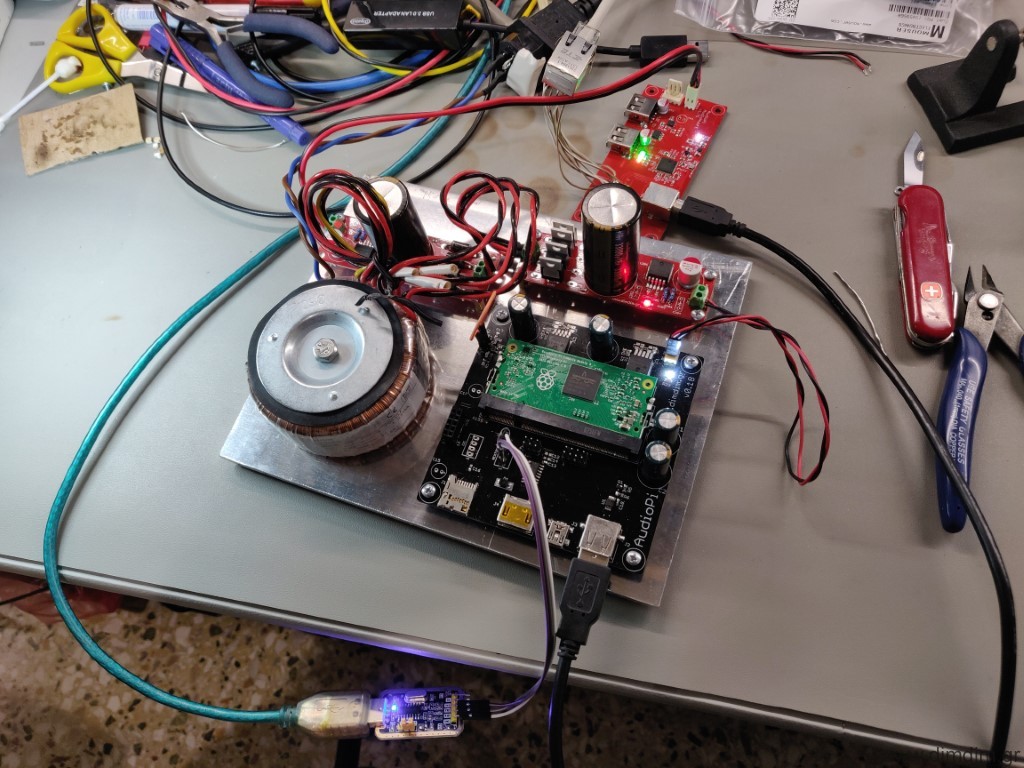
Next step is to design a single board integrating all of the components plus ultra high quality power supplies.
That will probably be a summer project..
All right, this one is long overdue..
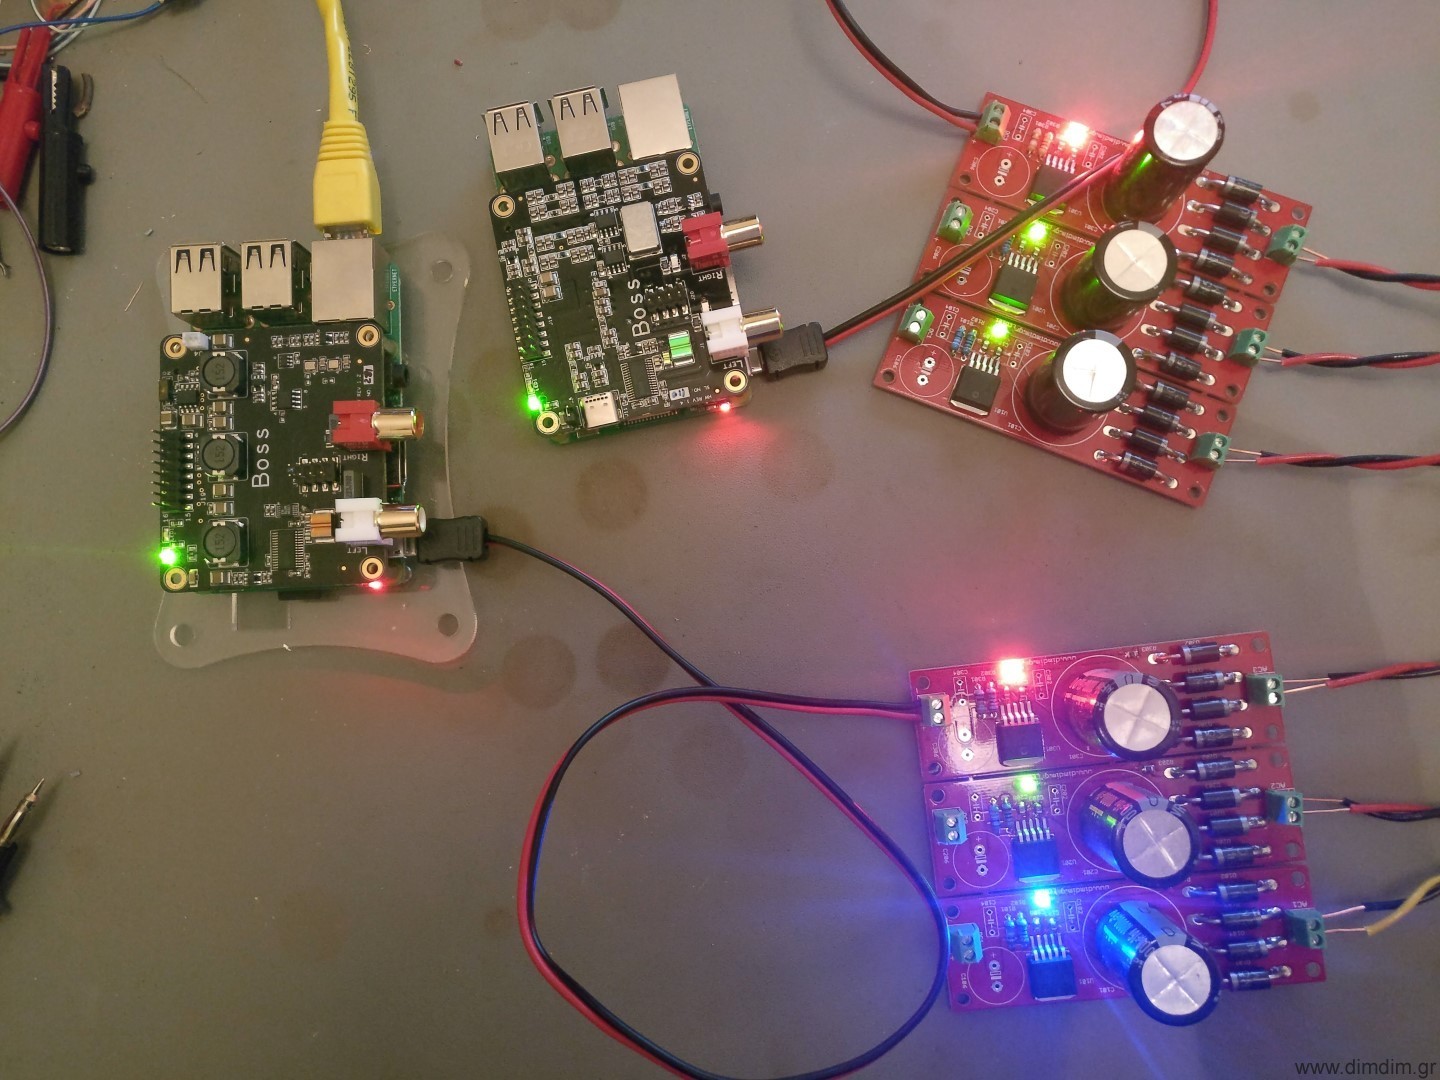
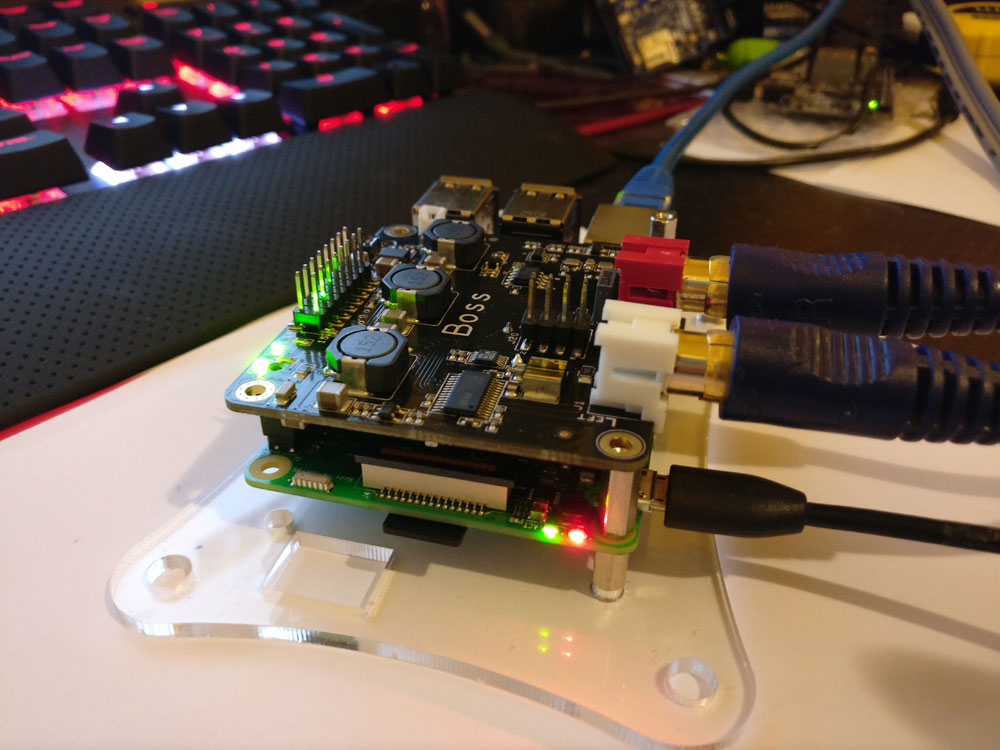
Allo.com was kind enough to send me their revised “Boss 1.2” RPi HAT DAC so that I could do a comparison to their already “best VFM” Boss DAC (that I had looked at about a year back).
For reference, this is the old Boss:
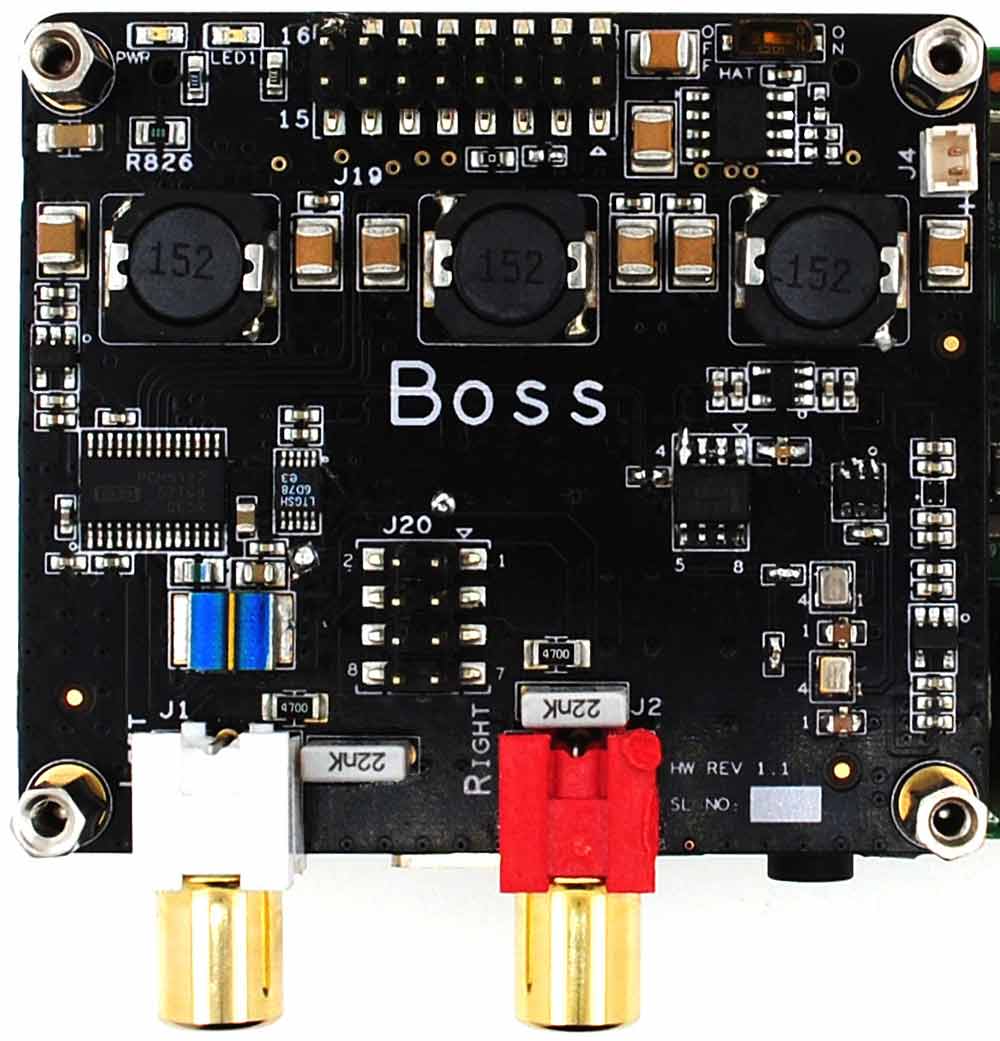
and this is the new one:
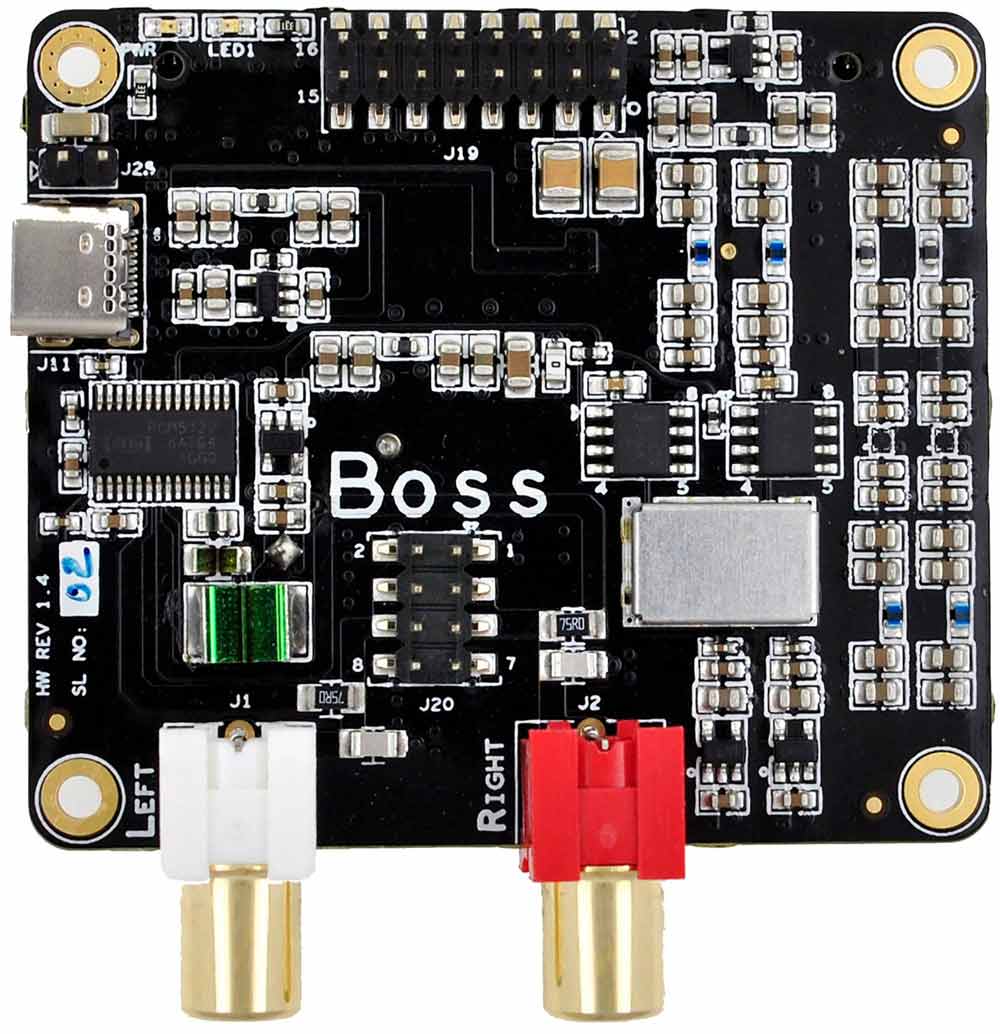
The new DAC features improved clocking (making use of the new “audio grade” “SDA” oscillators from NDK), improved powering scheme (including the addition of a USB type C port for dedicated external power as well as a new layout), and improved filtering capacitors in the output stage.
In order to do a fair comparison, I had to keep all external parameters the same. That meant using two identical Raspberry Pi 3 boards, running the same distribution (Archphile), with same settings, powered from separate but identical power supplies, using the same audio cables, into 2 inputs of my preamp.
Both of the DACs had run for several hours (or even days..) as a “burn-in period”.
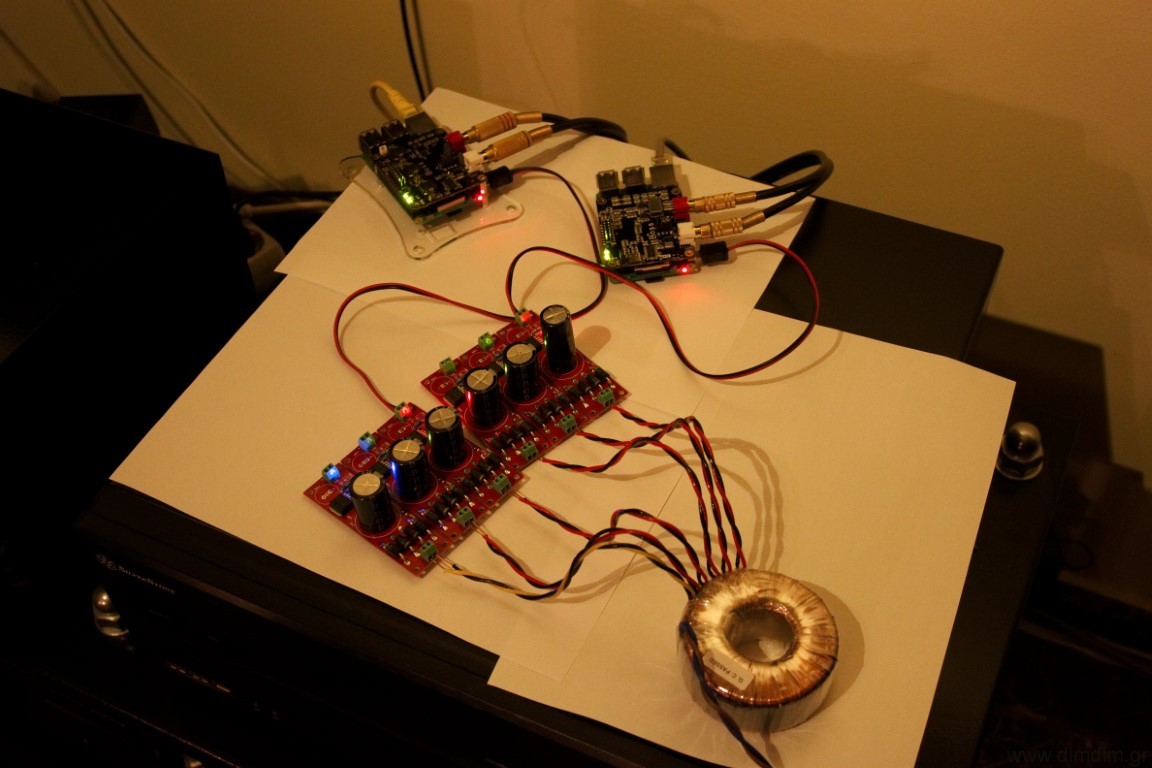
Power was delivered through a couple of identical custom-made USB power-only cables and data came in from a file server located several rooms away, through a single ethernet switch.
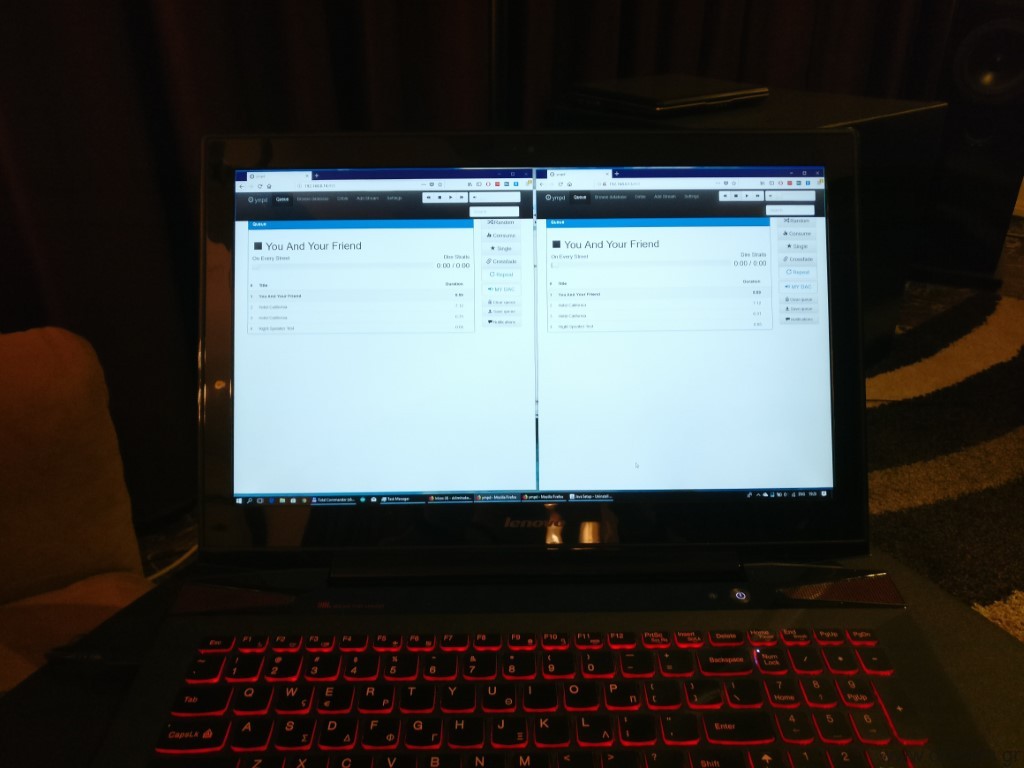
Control was through Archphile’s ympd web-based MPD client.
I sync’ed the playback of the RPis as best as I could and I set about switching between the two DACs by selecting either one or the other input in my preamp. The volume needed no adjustment – the two DACs output the same signal amplitude (not measured but fairly certain..).
I used a small number of test tracks, representative of both high quality recordings as well as contemporary pop music.
After some considerate going back and forth, I came to a conclusion. The new Boss 1.2 is a definitive improvement on the original Boss. The differences are not night-and-day, but they are there.
The 1.2 manages to have better bass extension, without sacrificing control. It also does a better job of placing the instruments in space, while also managing to sound more realistic – the vocals sound more real, the acoustic guitar sounds more like an actual guitar, and so on.
All of these “symptoms” are classic signs of less jitter being present in the system. So Allo.com’s choice of new audio-grade oscillators and the changes they made to the power supplies have paid off.
Good job keeping the title of “best VFM DAC HAT”. 🙂
Pretty much everyone agrees on this one, still, it took me a while to get on the bandwagon. Probably because I am not using an RPi as my main transport..
In order to test this I needed a proper linear power supply, capable of outputting at least one “real” amp at 5V. It would also have to be as low noise as possible. After some searching I ended up picking the TPS7A4501 for the job. Since its output voltage is adjustable, it would also come in handy for various projects. So I designed a PCB that would do a proper job of “hosting” the regulators along with the necessary rectification and filtering stages and had a bunch of them made.
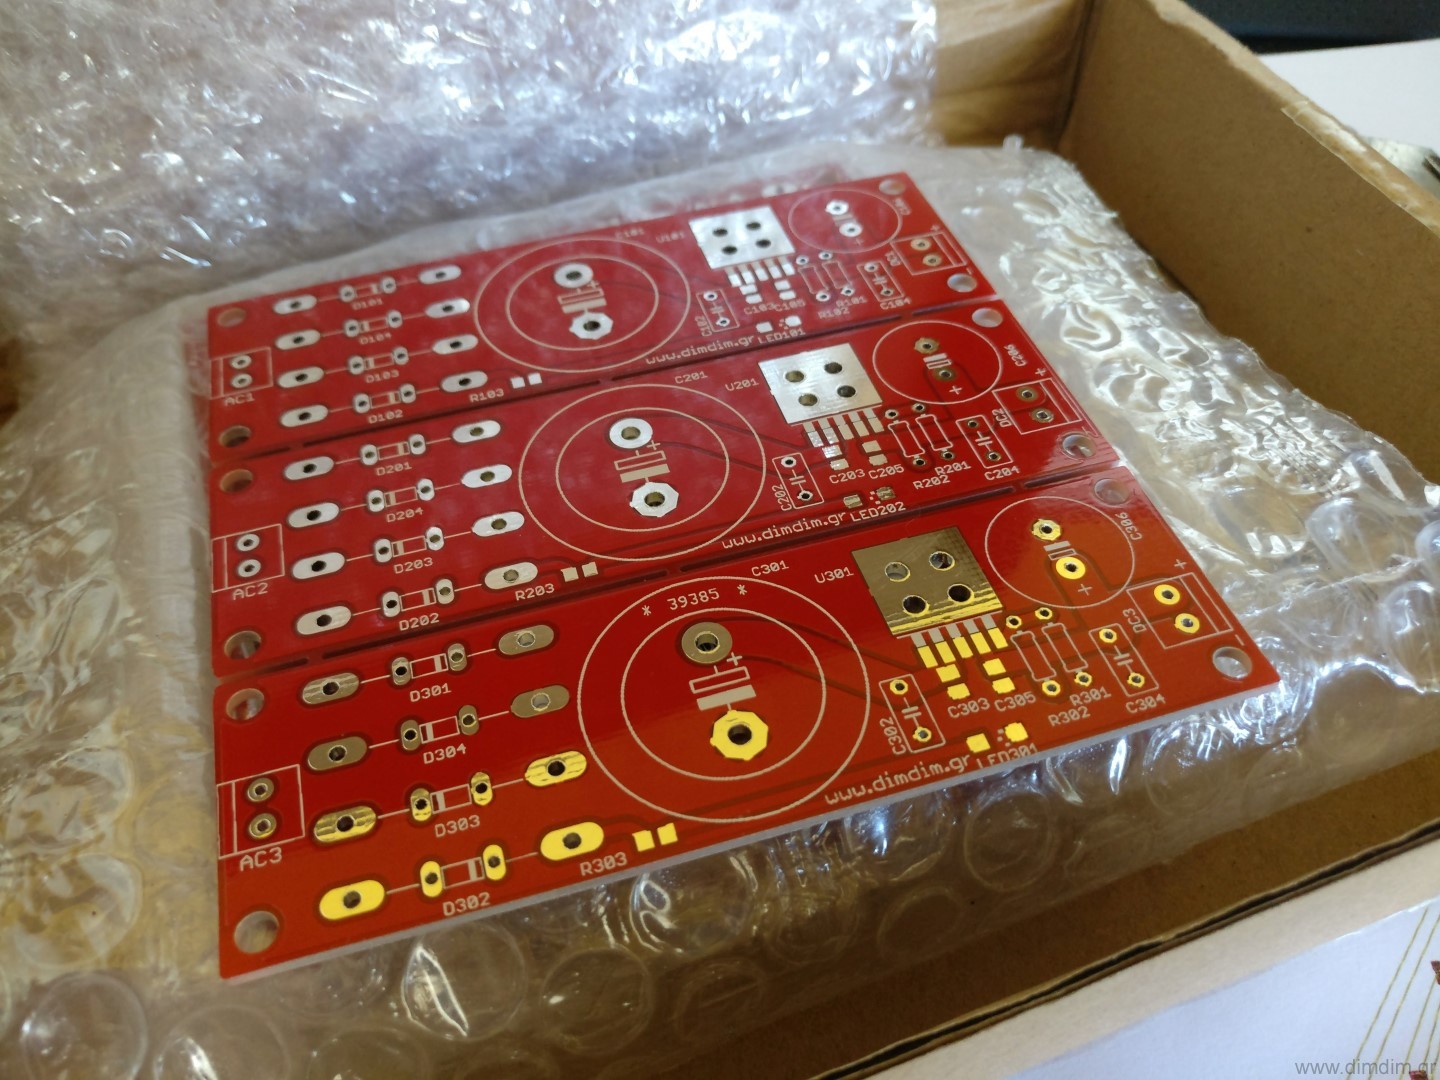
I also ordered a proper custom-made toroidal transformer, one that would have 5 secondary windings, each of them outputting 6VAC at 1.5A and one sixth winding outputting 3V at 2A. The end game would be to replace all of the RPi’s on-board switching regulators with linear ones.
But for starters I’d just power the RPi with 5V via its USB port. Here are a couple of RPi 3s being powered by my linear supplies. This setup would be used to compare the Allo.com original Boss with its new “v1.2” version. More on that in another post.
Power draw on the linear power supply was measured to be at about 500mA @ 5V.
My “reference” 5V SMPS is this one:
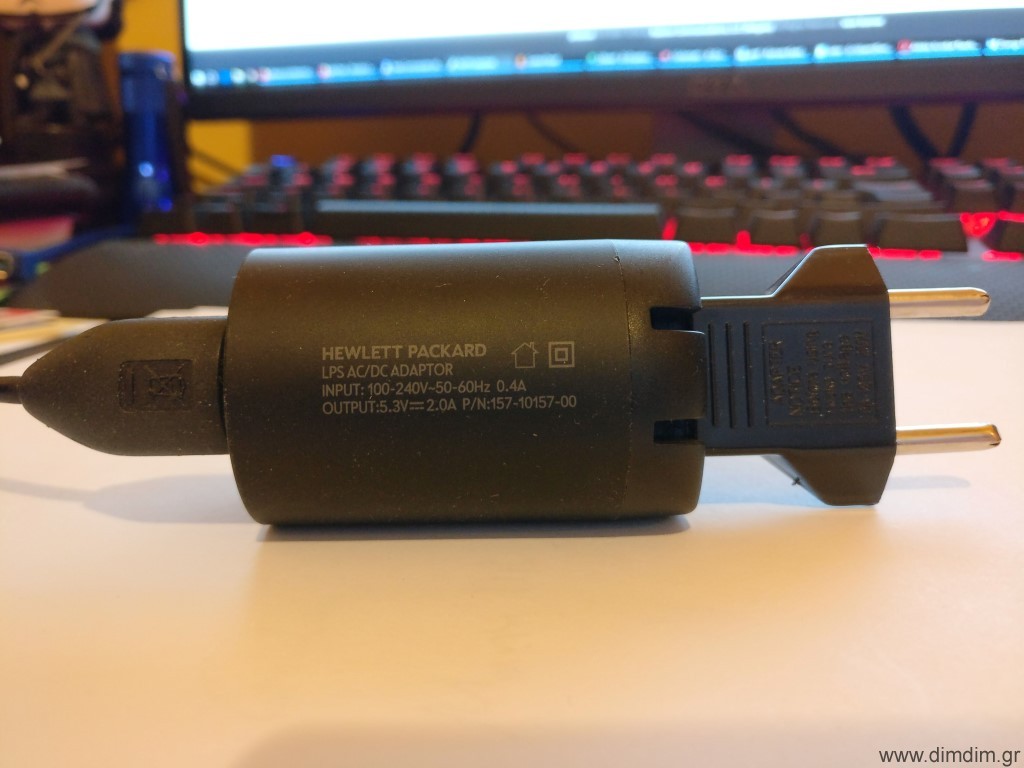
It’s an old but beefy switching mode power supply from an old HP tablet. It’s specc’ed at 5.3V @ 2A.
In order to be as impartial as possible, I took the setup to a friend’s house and had him and a couple of other friends audition the RPi powered either from the SMPS or by my linear power supply.
In both cases, the RPi was running Archphile and was connected to my upgraded-with-ES9028Pro-and-Mercury-Buffalo III DAC via USB.
The difference between the two power supplies was immediately obvious. It was like with the SMPS we had an at-best mediocre source – DAC combination, while with the linear power supply the setup became “proper”, it sounded “in-place” among my friend’s high performing system. The sound stage became better defined, the detail level went up, overall the presentation was more realistic. In other words, it was like the jitter of the system went down, but perhaps the noise levels in the system also decreased.
In other words, IMHO no serious audiophile should be powering his RPi by a run-of-the-mill 5V SMPS, even if he is using it as “just a USB transport”.
Back in September Allo.com had sent me their Piano 2.1 DAC along with their Kali reclocker, but I didn’t have any other DAC HATs to compare it to and it wouldn’t be fair to it to compare it to my Soekris or my Buffalo III DACs. This changed this week, when they sent me their new Boss DAC and by happy coincidence I also had the chance to spend a few days with the Mamboberry LS DAC+.
It was showdown time.
Technology
But before I get to the interesting stuff, a few words about the technology used in RPi DAC HATs.
An RPi DAC HAT is fed audio using what is called an I2S protocol. I2S was designed for transferring audio between ICs located on the same PCB, but audiophiles have somewhat stretched its capabilities by using it to transfer audio data between PCBs and some times even between stereo components. It is considered the best, most accurate way to transfer audio data, provided that the I2S signals are properly generated. The RPi has a well-known and documented problem generating proper I2S signals. The problem has remained the same, even though the RPi is now at its 4th generation.
Right now, there exist two ways to deal with this problem:
1) Use some kind of FIFO buffer and reclocker in order to regenerate the I2S signals. Examples of such FIFO reclockers are Ian’s FIFO and allo.com’s Kali. The RPi is configured to output a standard I2S signal and then it’s the job of the FIFO buffer to “fix-up” this signal. The resulting I2S signal is of very high quality, since the FIFO buffers utilize very high quality oscillators and power supplies.
2) Run the DAC in what is called Master Mode. Let’s talk a little more about that.
There are two modes of operation for I2S compatible chips. In case of DAC chips:
Slave mode: The DAC receives all of the I2S signals (BCLK, LRCK and DATA) from the RPi. It is susceptible to jitter since the RPi’s I2S output is problematic.
Master mode: The DAC uses its on-board oscillators to generate the BCLK and LRCK signals, it then sends these signals back to the RPi which uses them to clock its DATA output. This way the RPi does not need to use its own clock, which is problematic for audio use. The end result is an I2S signal of reasonable quality.
Note that not all DAC chips can operate in either of the two modes. Most widespread is the Slave mode, in fact practically all DAC chips support it. The Master mode is supported by a small percentage of DAC chips, like the PCM5xxx series by Texas Instruments or the new ESS DACs (like the ES9038Pro). Well known DAC chips that do not support Master mode include the older ESS chips (ES9018, ES9018K2M, ES9023, etc) and the Asahi Kasei DACs (AK4490, AK4495, AK4497, etc.).
The DACs
With that out of the way, lets see our contestants.
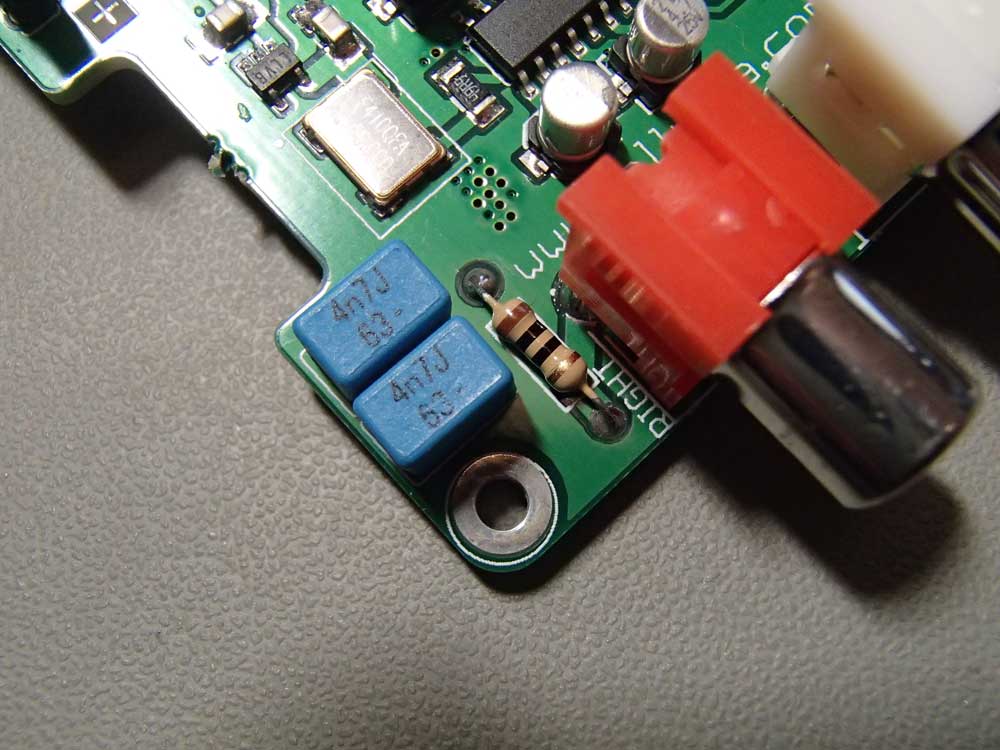
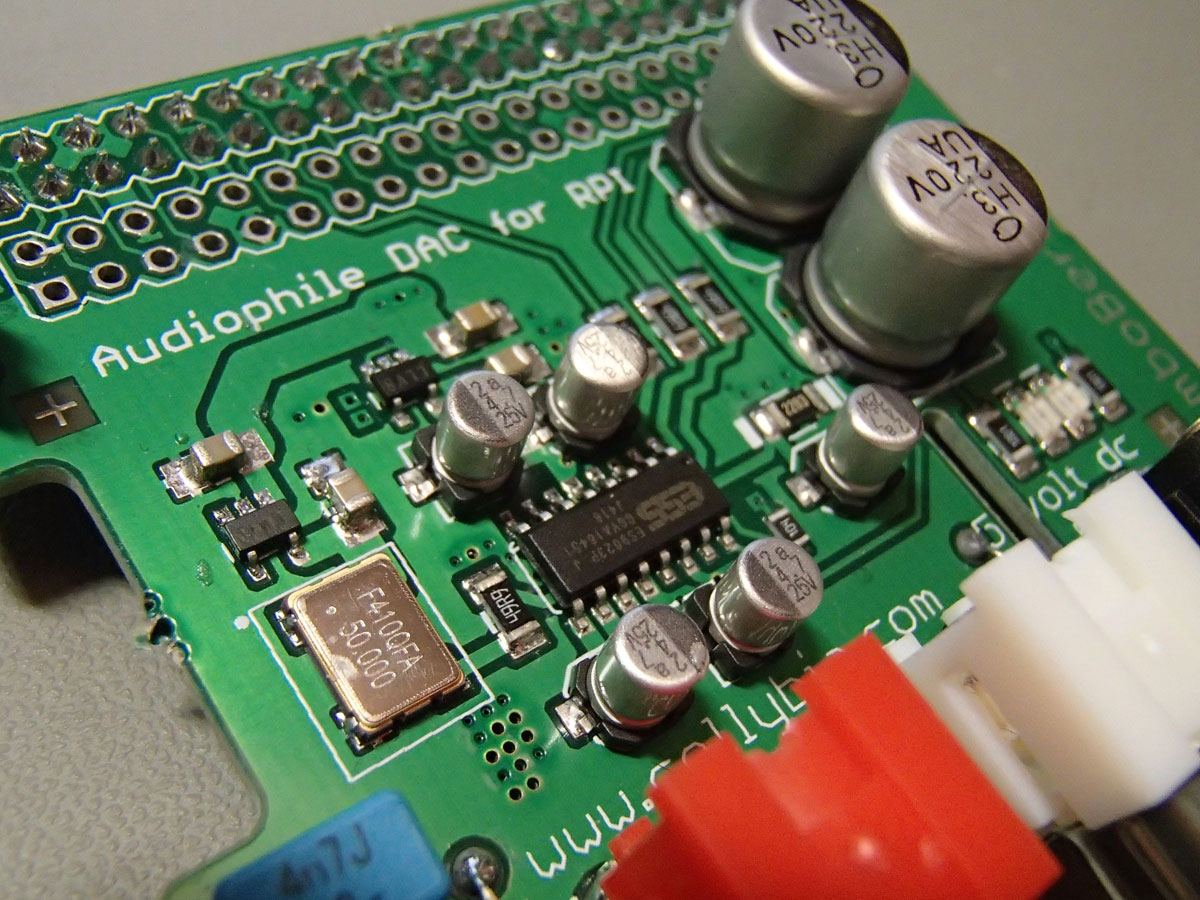
The Mamboberry LS DAC+ is a moderately priced (54.90€) ES9023 based DAC designed to run in slave mode to the RPi. It is considered one of the better sounding HAT DACs out there.
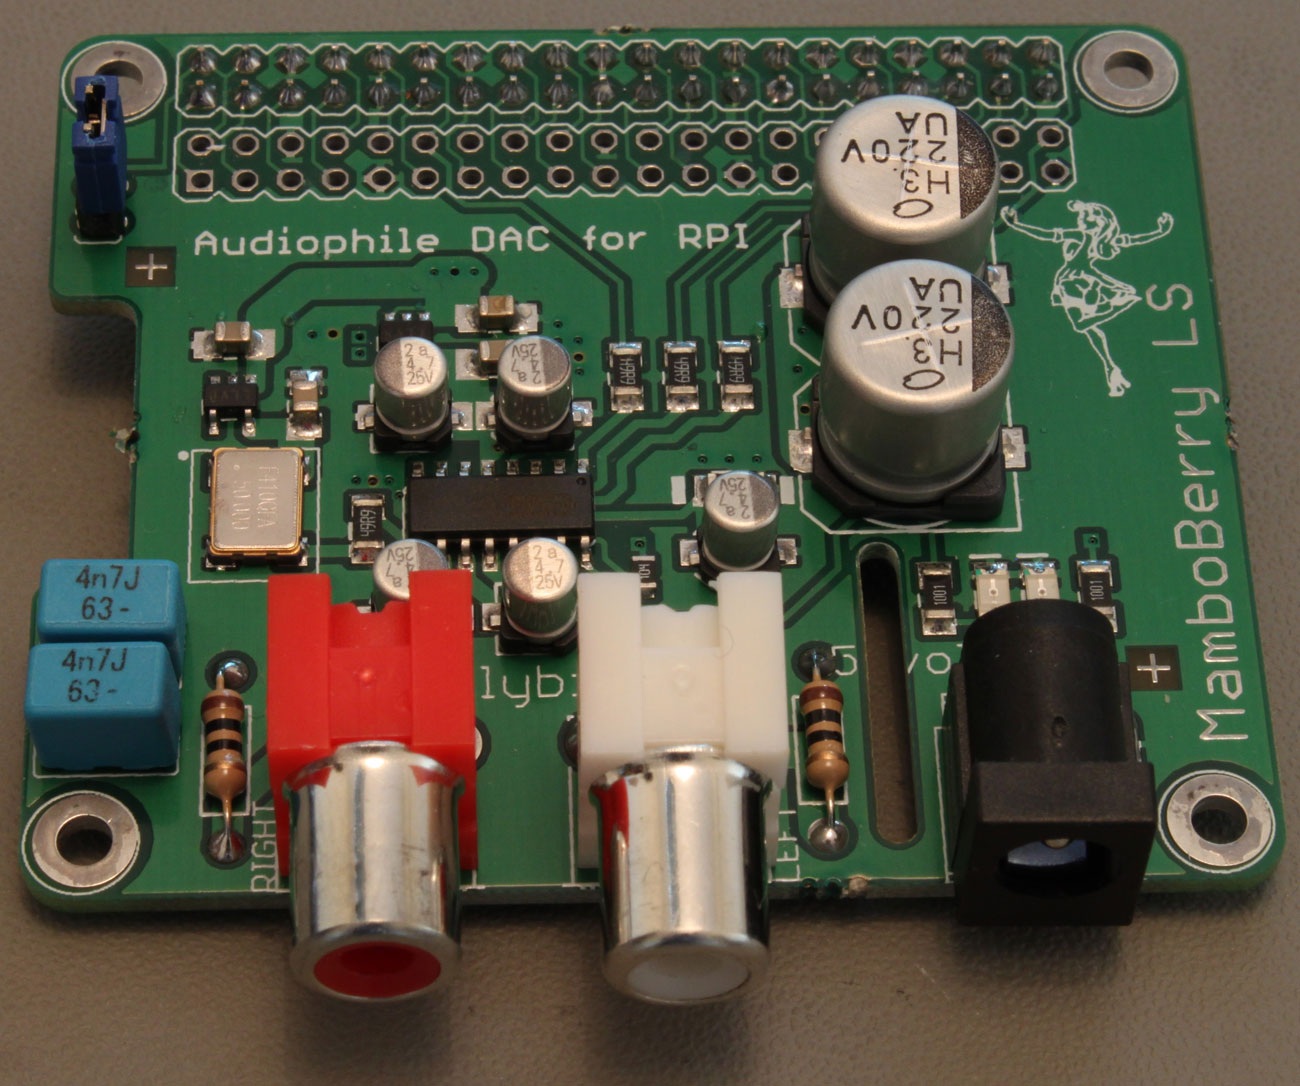
It has an on-board high quality oscillator (by Fox) running at 50MHz (this essentially means that the 9023 is running at asynchronous mode, that is it is resampling all incoming PCM signals), very good quality LDO regulators and passive components.
It may be powered either through the RPi or by an external (preferably linear) power supply. Officially the ES9023 supports sampling rates up to 192KHz but unofficially it goes up to 384KHz / 32bit. It doesn’t really require special software support on the RPi, you just set it for “generic I2S output”.
The Allo.com BOSS DAC is a somewhat pricier (~70€) master mode DAC.
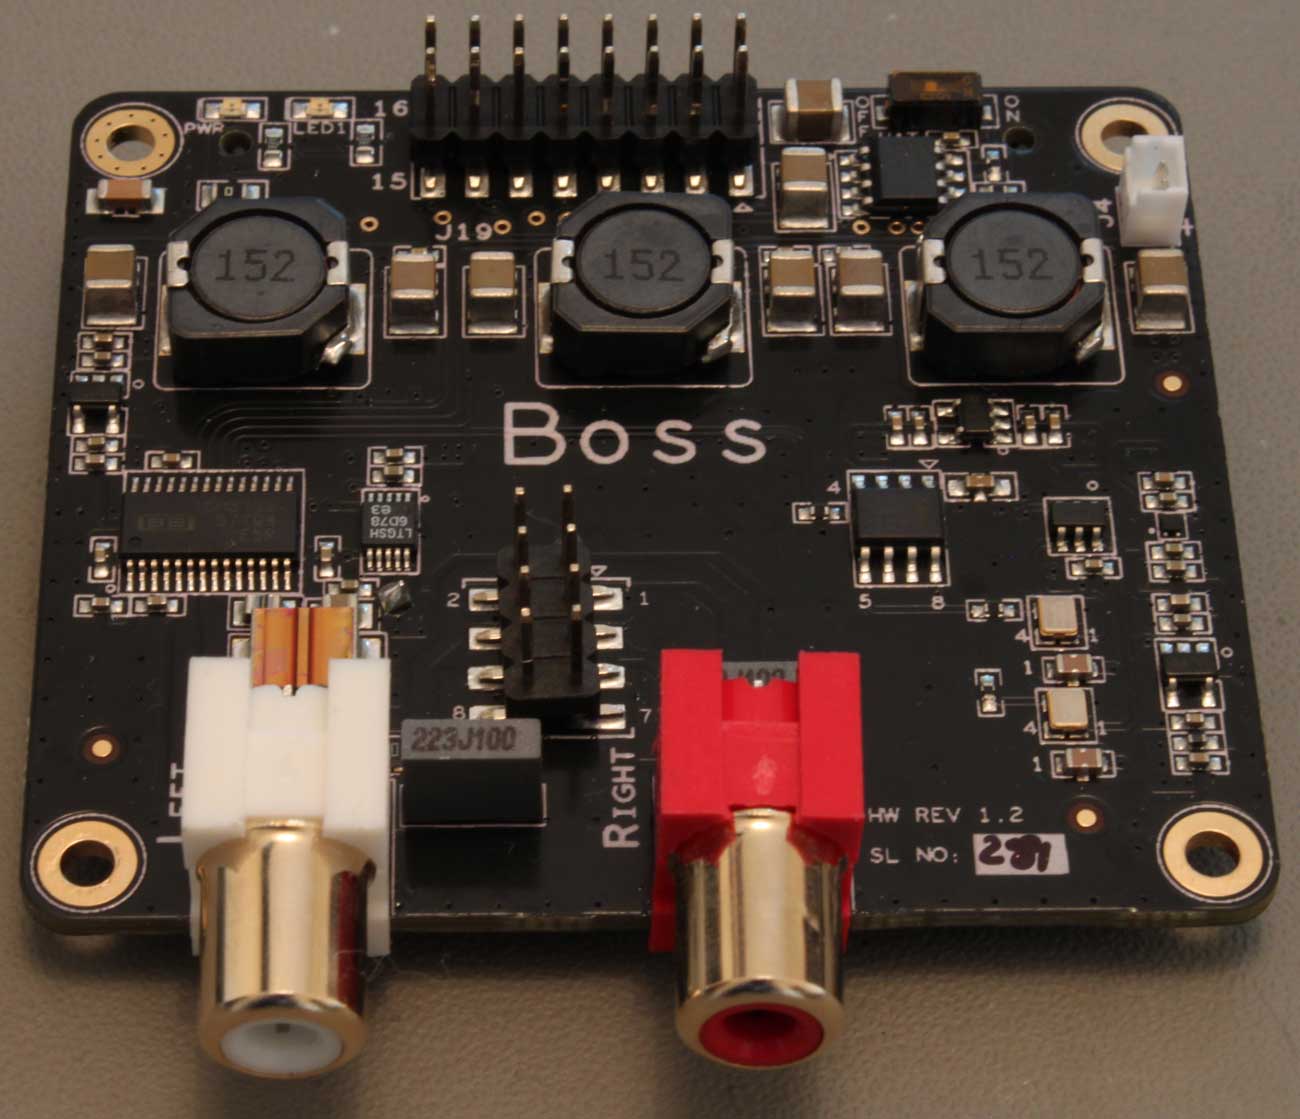
It is based on the PCM5122 DAC, powered by a top-quality LT3042 LDO regulator utilizing DC filtering by very high quality capacitors (including a 330.000uF supercapacitor!).

Clocking is done by a pair of NDK extremely low jitter and low phase noise oscillators (45.1584 & 49.1520 MHz), powered by their dedicated LDO regulator. Their output is buffered by an NB3L553 clock fanout buffer IC which further reduces the jitter.
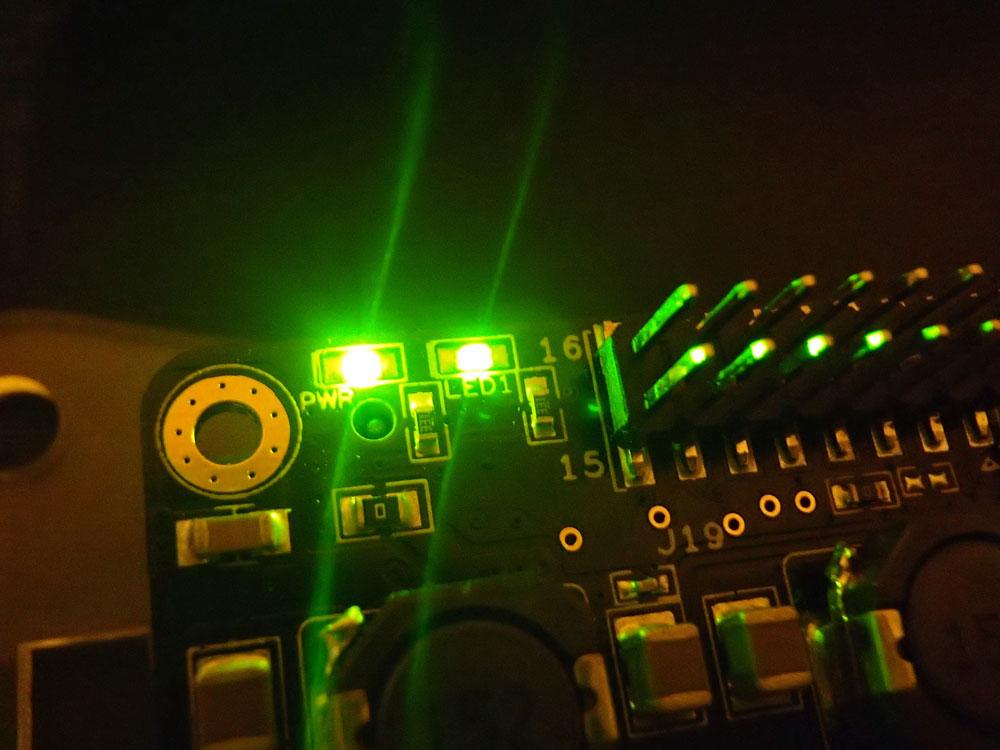
Sampling rates up to 384KHz / 32bits are officially supported. It’s powered through the RPi, but it has an “Optional 5V battery power in connector” for future use. I suspect that this connector can also be used to power the Boss, but a certain resistor will need to be removed to isolate this power from the RPi. This DAC needs a special driver, since it needs to set the RPi in slave mode and also communicate with it via I2C to set operating parameters and utilize the PCM5122’s hardware volume control. When the DAC is receiving data from the RPi, the indicator “LED1” lights up.
The Allo.com Piano 2.1 Hi-Fi DAC is another moderately priced (~55€) slave mode DAC, based on PCM5142 DACs. Notice the plural.
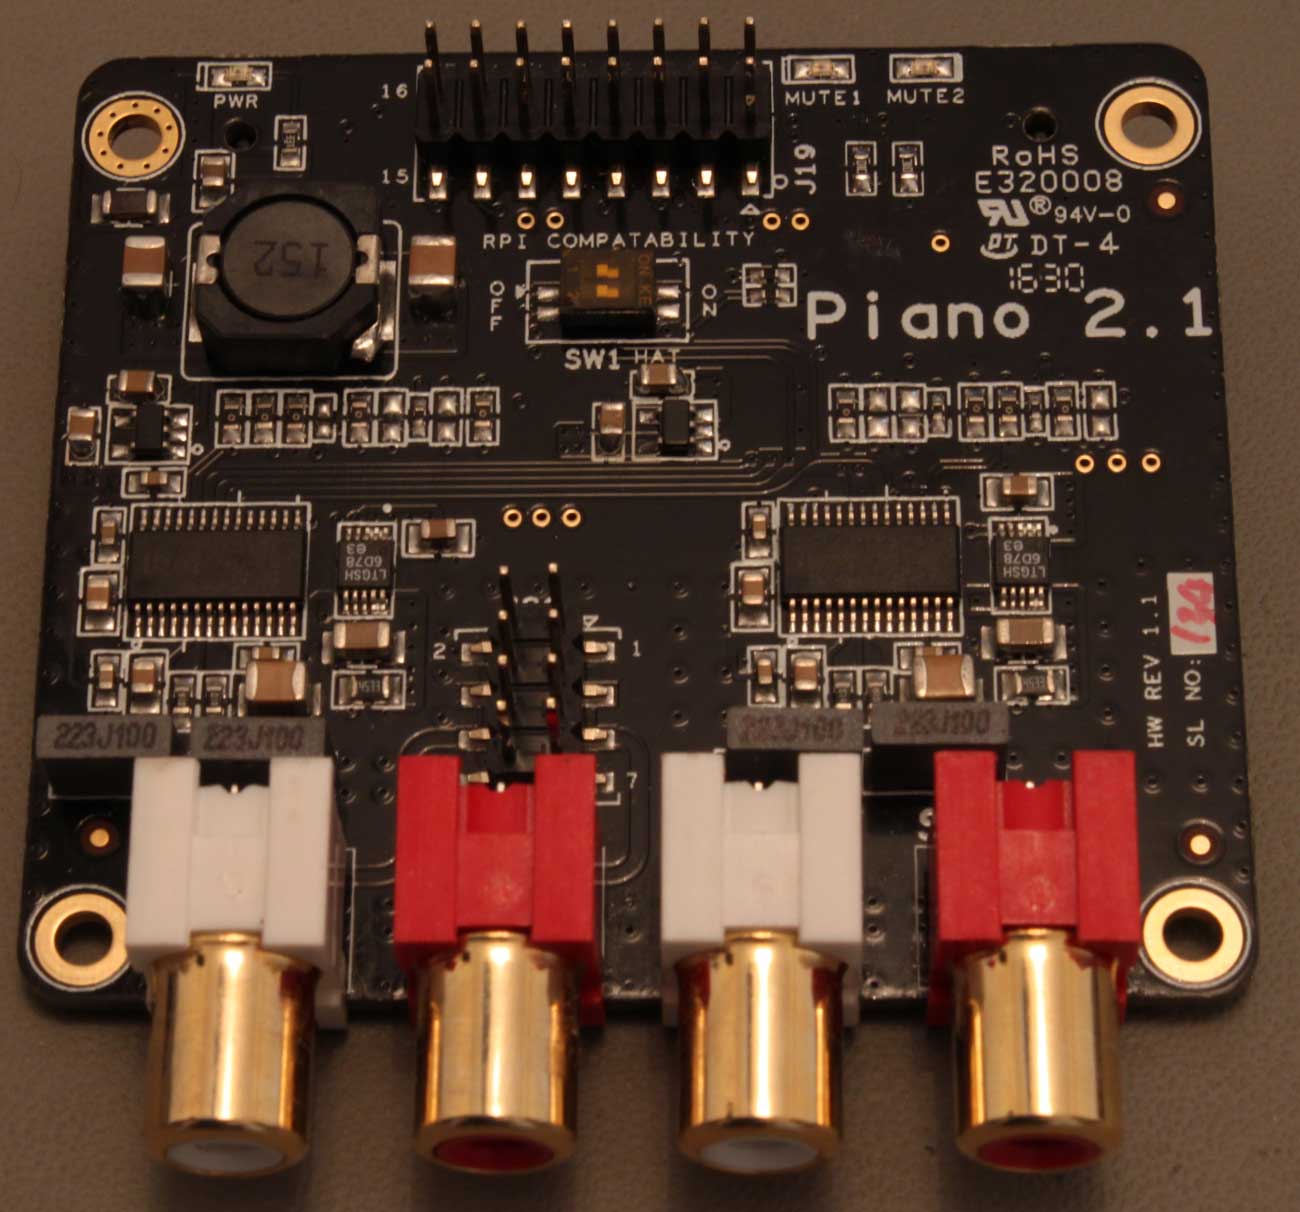
On board this HAT we have two DAC chips that output a total of 4 channels. Each of the DAC chips also contains a DSP core, capable of doing equalization, filtering or other functions. These DSPs can be configured using TI’s PurePath software, but that is not a trivial task. The distributions that include built-in support for the Piano 2.1 come with a pre-built set of filters, capable of essentially configuring the DAC in 2.1 mode so that it can be used with one or two subwoofers. The analog sections of the DAC chips are powered by two top-quality LT3042 LDO regulators.
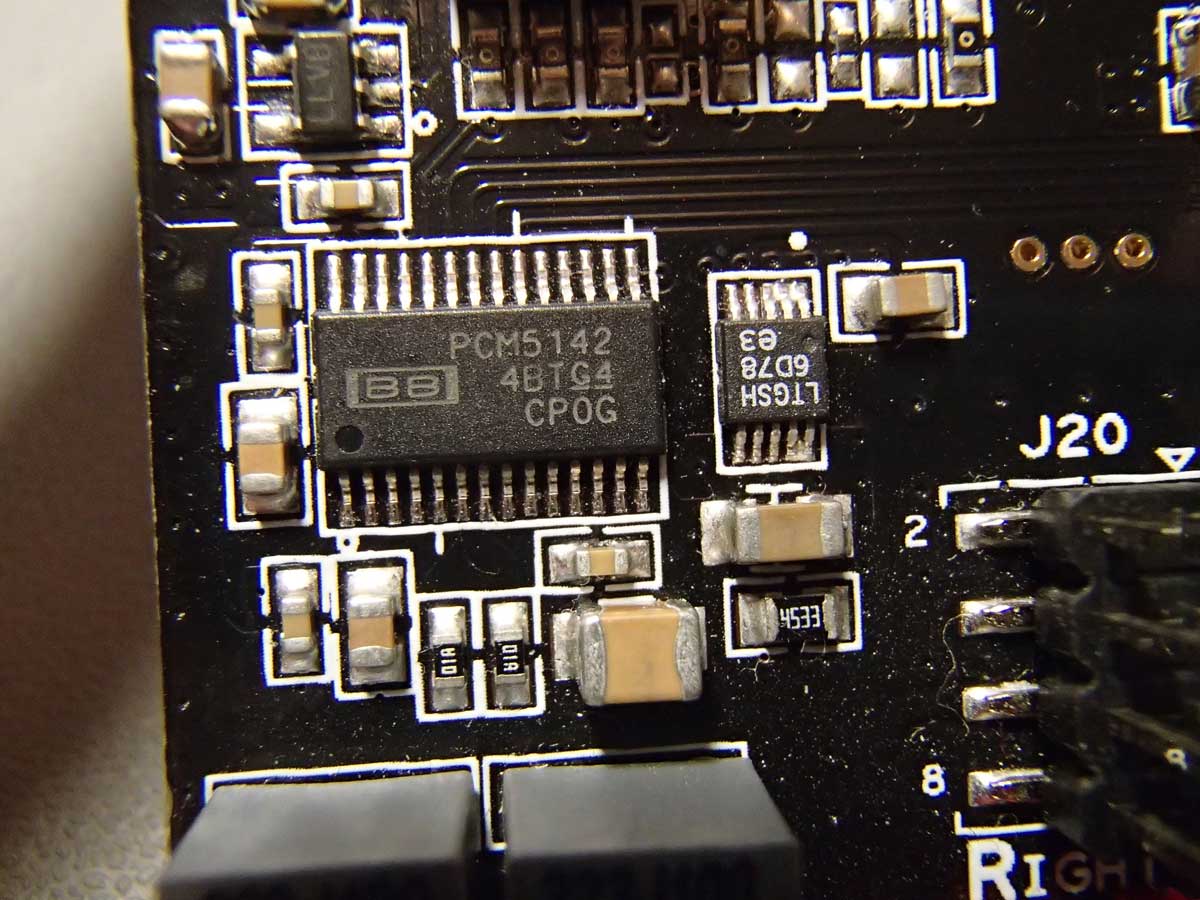
There exists no on-board oscillator, since the DACs are running in slave mode. Sampling rates up to 384KHz / 32bits are officially supported. Power is supplied by the RPi. As you can imagine, this DAC also needs a special driver, since it needs to set up the filters in each of the DAC chips plus to utilize the PCM5142s’ hardware volume controls.
A word about audio distributions
There are many audio-oriented distributions available, such as Archphile, RoonAudio, Moode and Volumio. In order to do a fair comparison, I opted to use the same distribution for all tests. The logical choice was Volumio, since it includes proper support for all of our DAC HATs.
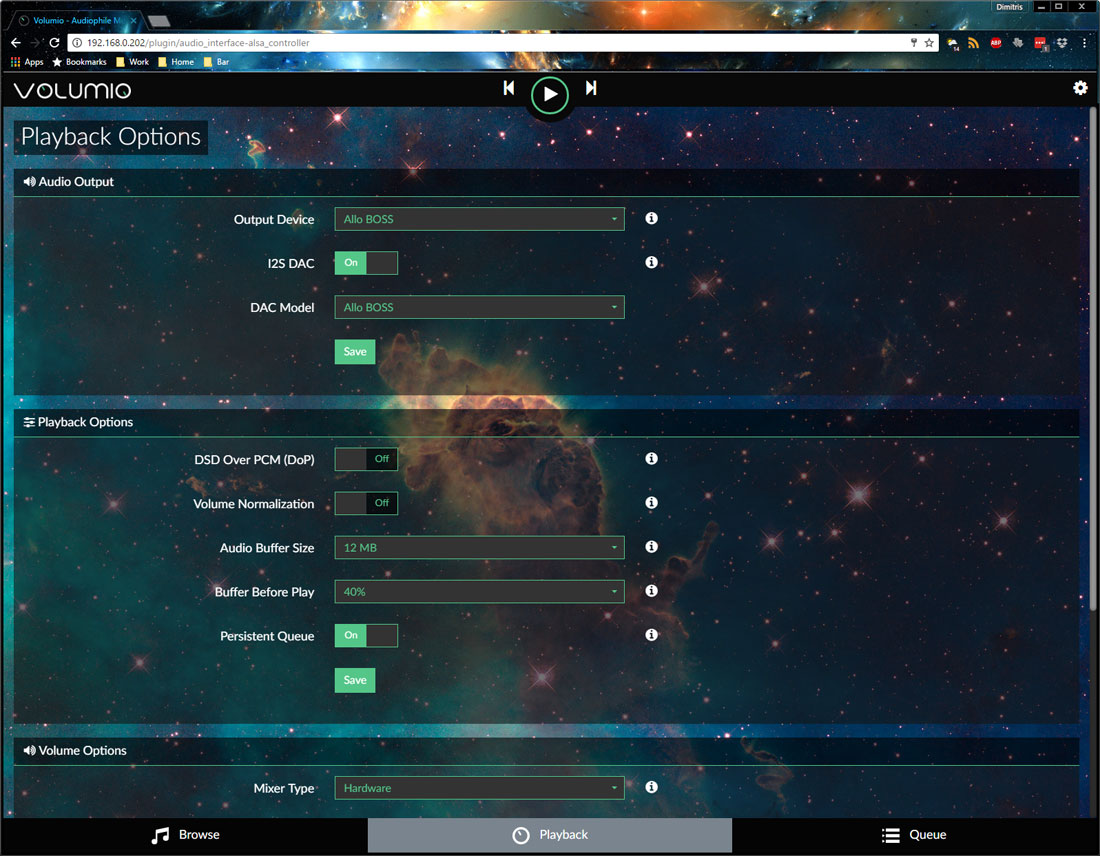
Volumio is very easy to install and is very responsive in my RPi3. No complaints whatsoever.
Testing Methodology
The idea was to test the DACs in their default operating mode, that is with no mods and no exotic power supplies. When testing without Kali, the RPi3 & DAC were powered by a 5V 2A SMPS I had lying around from an old tablet. It’s a pretty high quality unit, made by HP. Still, at the end of the day it’s just a wall-wart SMPS.
When testing with Kali, I powered the RPi3 with the same SMPS plus I used an 7805-based linear power supply for the Kali & DAC (jumper on Kali was removed to isolate its power from the RPi’s). Again, nothing exotic. Just a relatively low power (1A max) linear power supply.
After I had an initial listen to all of the DACs in pretty much every possible combination, like “plain DAC” or “DAC with Kali” (where applicable of course) and drawn my conclusions, I thought I would take the system “on tour” to a couple of my friends and their superior sound systems. By doing this I was getting a second and third opinion. So, friend#1’s system is a full-blown MBL installation costing upwards of six figures. His main DAC & transport’s cost is in the 20K range. Friend#2’s system is a more DIY affair, consisting of big (and I mean BIG) Magnepan speakers, diy solid state power amp (several hundred watts per channel, many of them in class A, it makes a lot more than a ding in his power bill), diy preamp, Sony XA50ES modified CD player plus (on loan from me) a Soekris DAM1021 DAC.
At friend#1’s, we used an SPL meter to equalize the volume levels between all of the DACs. We listened to 3 specific tracks. At friend#2’s, we also listened to the same 2 or 3 tracks on all of the DAC combinations but didn’t take much care of level matching. The observations of my two friends were practically the same, so I won’t distinguish between them.
The Results
We started with just the RPi with Mamboberry LS. The sound was OK, not nearly what you would call “hi-end”, but considering the DAC’s cost it was more than satisfactory.
We then moved on to the RPi with the Boss. The improvement in audio quality was more than apparent. The soundstage became better defined, the instruments more clear, the bass just.. more, but in a good way.
Next up was the Mamboberry aided by Kali. Kali did more than just fix up the I2S signal – it also provided clean power to the Mamboberry. Now the Mamboberry began to show its teeth. This combination gave a more clear result than the Boss DAC, like the music became even more life-like. The bass did not have the same authority, but overall the combination Mamboberry & Kali definitely sounded superior to the Boss.
Finally, we teamed the Piano 2.1 to the Kali. The Piano was configured in stereo mode, since there were no subwoofers present. This combination gave the best overall result, giving a more “analog”, musical result. Its sound was the most smooth of all of the combinations, while at the same time it was the most life-like. You could say that it was the least fatiguing of the bunch.
After we were done comparing the HAT DACs, we thought we should listen to our “proper” DACs, just to put things into perspective. To no surprise, both my friend#1’s DAC and my Soekris properly cleaned the floor with the HAT DACs and it’s a good thing that they did – otherwise we would have felt pretty dumb having wasted so much money on so-called “proper” DACs while we could have got the same result with these DAC HATs. Phew.
So, the end result is not really surprising. The more money you spend, the better sound you will get. No giant killers here. But regarding value-for-money, I think that the Boss DAC claims the prize.
Happy π day everyone! 😀
Back in August an interesting thread was started on diyaudio.com.
It described a FIFO buffer and reclocker, aimed at SBCs and more specifically the RPi.
Its name was Kali.
The FIFO board would be able to “fix up” the RPi’s problematic I2S output so as to improve the sound quality of the used DAC.
As the discussion progressed, more interesting details came to light.
Kali was basically an FPGA design with on-board RAM, high quality clocks and flip-flops. It would buffer the DATA stream in RAM (about 0.7 seconds of audio) and it would then reclock it using flip-flops outside of the FPGA. The clocks used for the reclocking would be high quality NDK units sporting extremely low phase noise.
It would be powered by a 5V/3A power supply and would supply filtered power to the RPi (or not, selectable by a jumper) as well to the DAC that would sit on top of Kali.
It would have a claimed 3ps of jitter, which is an impressive feat for any I2S source.
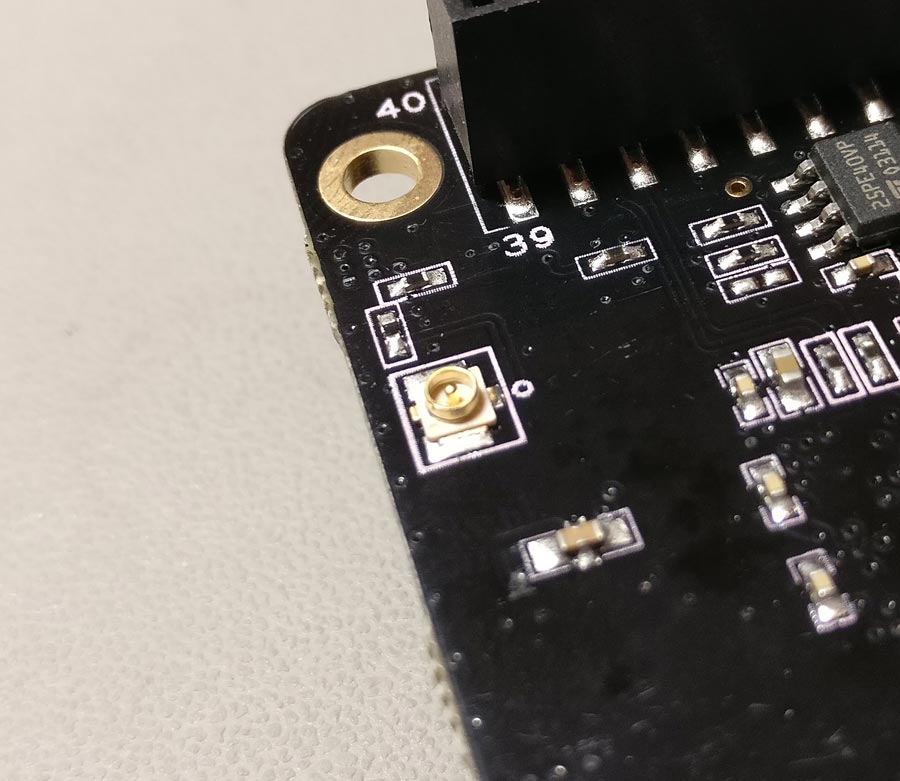
It would provide a high quality MCLK output from a U.FL jack underneath the board.
The board’s general availability was scheduled for the end of August, and its price would be in the neighbourhood of $70.
At around mid August cdsgames offered to give away a number of units to diyaudio members for testing. I took him up on his offer and he was kind enough to send me one (along with a Piano 2.1 DAC board, but that’s for another post).
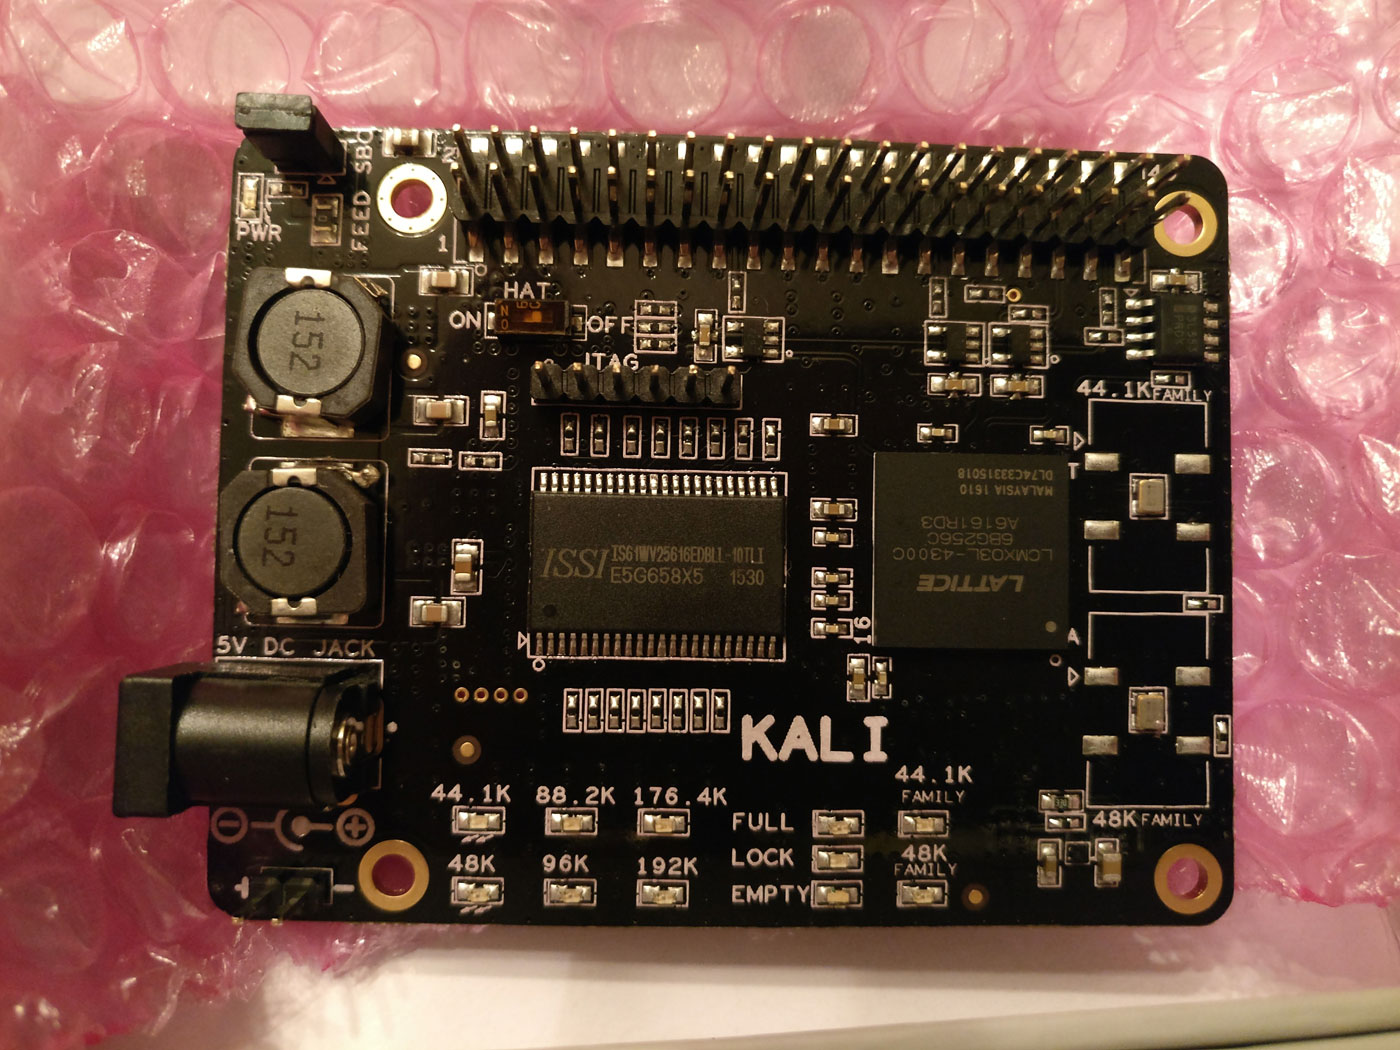
Fast forward to mid-September, when I received a package from India. In it was Kali and Piano 2.1 (more about that in another post).
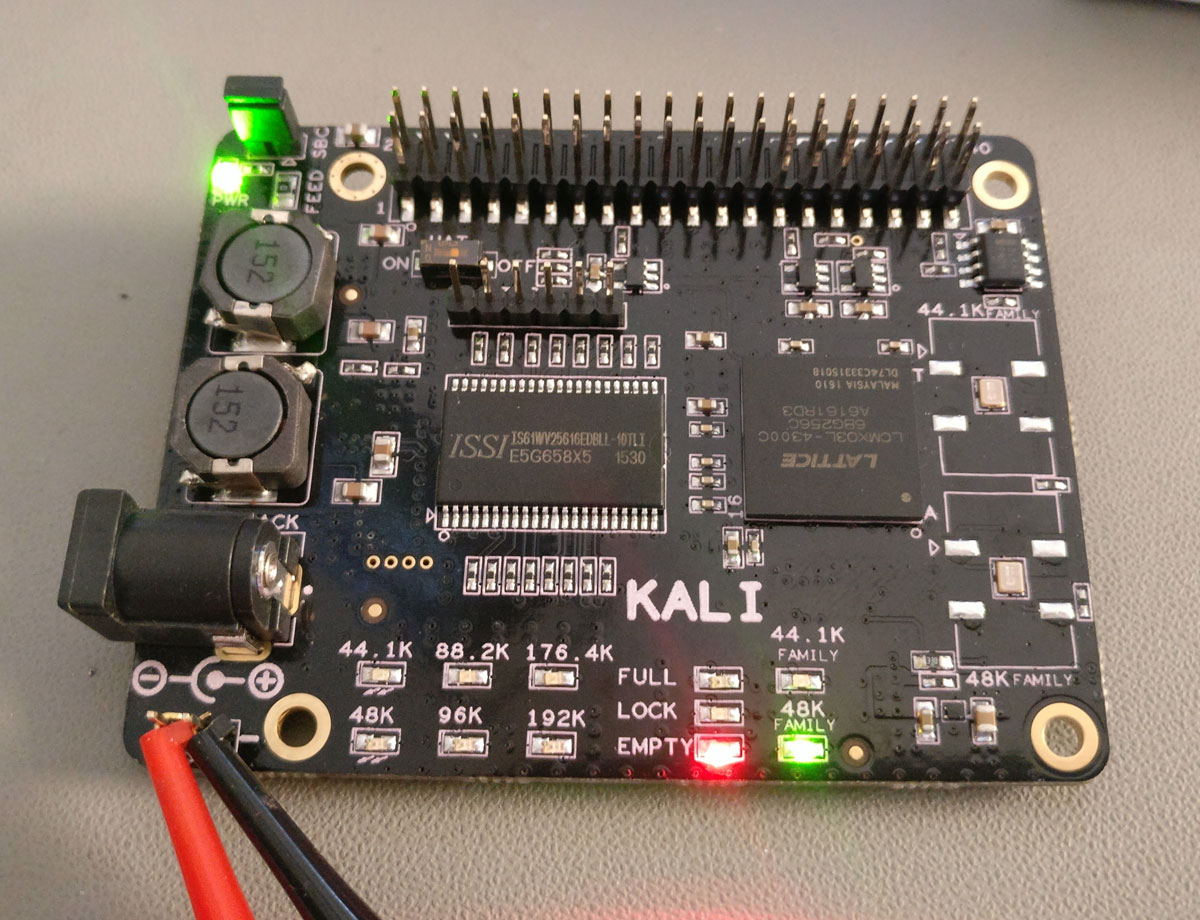
On the left side of the board we can see the DC IN jacks (barrel and pin header), plus a couple of inductors that help with filtering the power lines. On the top left there is a jumper that controls whether Kali will supply power to the RPi or not. The Kali lists as minimum requirement a 5V/3A power supply. However, Kali itself will consume only about 100mA. The rest of the power is intended for the RPi and the DAC board. Note that Kali is designed so that it powers the RPi and not the other way around.
In the middle of the board the two chips that dominate are the 4Mbit SRAM chip and the Lattice MachXO3L-4300 FPGA itself.
To the right we have the two NDK clocks, one for each one of the two “families” of sampling rates.
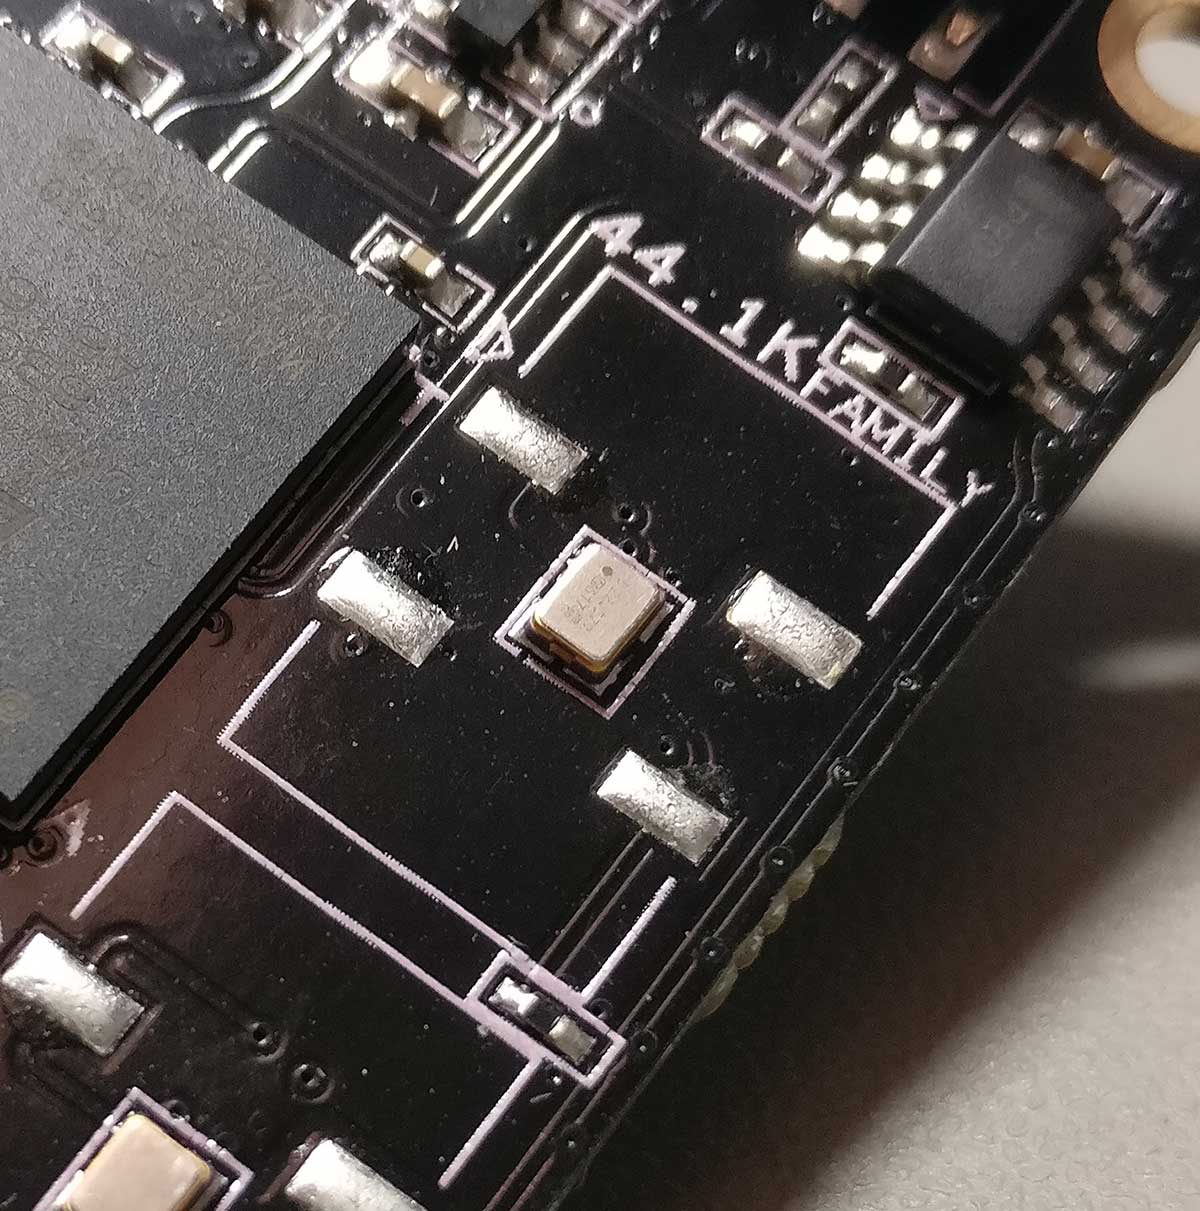
The Kali comes in two versions. One with clocks at 22/24MHz, capable of supporting sampling rates up to 192KHz, and one with 44/48MHz clocks, going up to 384KHz.
Note that there are two footprints available for the clocks so that a curious (and somewhat experienced) DIYer can also try out clocks with different footprints, like for example Crystek units. If you choose to go that way, keep in mind that you will also need to change 2 capacitors from 0.01uF to 0.1uF.
At the top of the board we have the usual 2×20 header that reproduces the RPi’s GPIO pins. There is one notable exception – Kali does not supply 3.3V at the relevant pin, so if your DAC needs to take 3.3V from that pin it will not work (more on that later).
Note that even though Kali has a JTAG header, the manufacturer currently does not support firmware upgrades. That’s understandable.. JTAG is not for consumer use and the manufacturer has to protect his IP..
At the lower end of the board we have an array of LEDs indicating the sampling rate of the incoming signal, along with the status of the buffer (Empty / Full / Lock) and the selected oscillator.
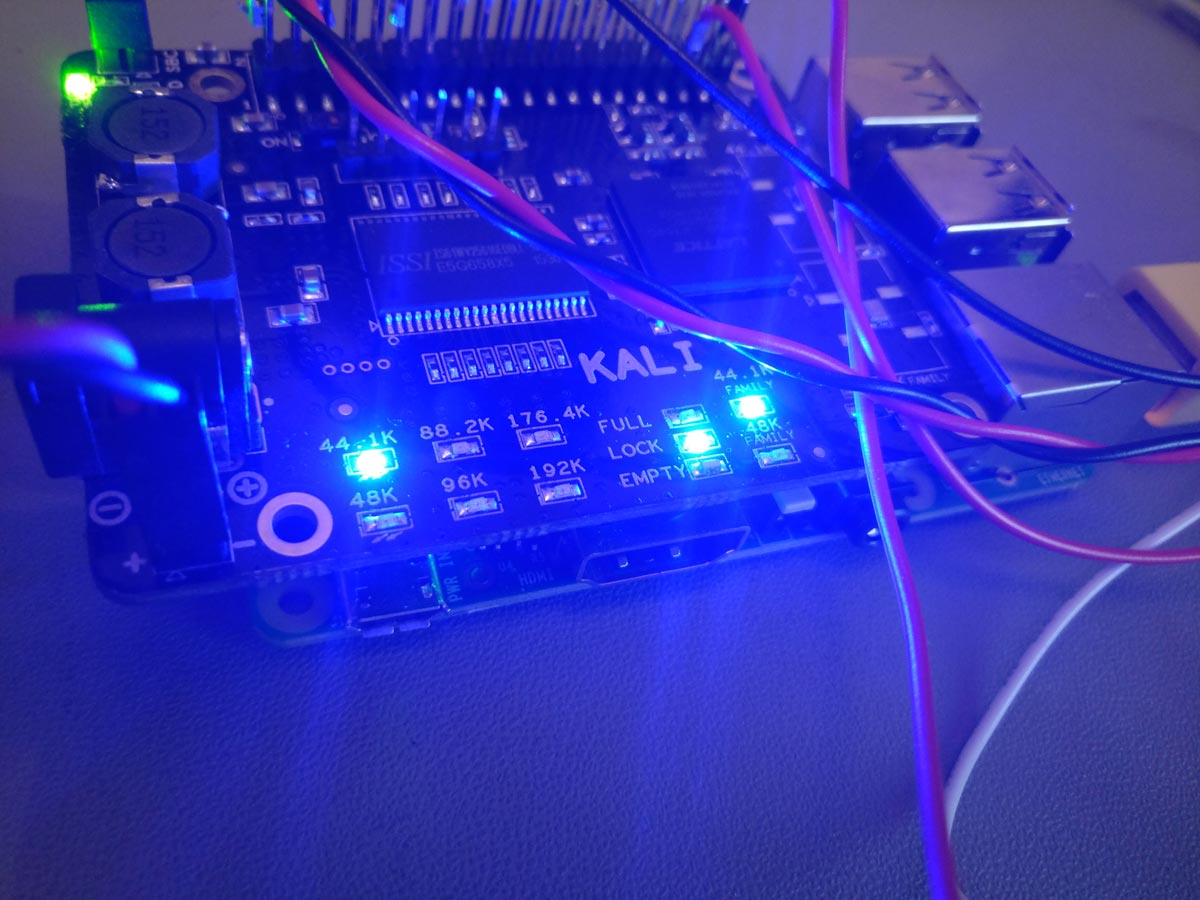
At the bottom of the board there is a U.FL socket that outputs Kali’s MCLK.
So, we have an RPi, we have Kali, now what we need is a DAC. Kali will put a few restrictions on your DAC choices. Your DAC will have to run as “slave” to the RPi, that is it will have to take its BCLK from the RPi and not the other way around. Examples of such DACs include for example virtually all of the DACs based on ES9023 chips. DACs that are designed to run as masters (in order to battle the RPi’s legendary jitter problem), such as the Hifiberry Dac+ Pro & Digi+ will not work, at least not without some extra work.
Plus, like I mentioned earlier, Kali does not supply 3.3V on its top 40-pin header, so if your DAC requires that voltage you’ll need to find a way to supply it externally.
Straying a bit from the DAC HATs, Kali will have no problem feeding pretty much any DAC that accepts standard I2S, like for example a TPA Buffalo DAC.
As a matter of fact, in my system Kali did a remarkable job of improving my RPi’s I2S output. The difference was obvious immediately. My RPi went from being a “net streamer quality” source to giving my Amanero a run for its money. Remarkable.
I am not talking about differences in bass or treble or tonality. It is like Kali manages to extract more music content from the data files. It revealed details that were there but were not audible. The music became more “real”. Imagine going from SD TV to HDTV. And that with the same 44.1K/16bit source material.
This improvement is not apparent only on expensive gear either. My first tests were done on my workbench with my RPi feeding an $8 9023-based DAC and listening through my headphones.
Even with this setup, Kali made a significant improvement to the sound. The $8 DAC went from sounding like an $8 DAC to performing at least decently. It was an obvious improvement.
So I can not imagine a scenario in which the Kali will not make an audible improvement to the sound.
Note that the first batch of Kalis (the ones that were sent to reviewers and a small number of units that were actually sold) had a bug that caused 16bit audio to have its channels reversed (and some more weird stuff happening with their I2S output resulting in somewhat degraded sound quality), but according to allo.com all effected units have been exchanged with fixed ones plus the ones that are shipping now to customers come with a fixed version of the firmware.
Even if for some reason you come by an affected unit, all you have to do is tell your RPi to output 32bit audio. That will fix everything.
I’d like to thank Ioan (cdsgames at diyaudio.com) for sending me the remarkable Kali. It will for sure become a permanent part of my audio chain.
At the time of this writing, Kali is being sold directly from its manufacturer’s site (allo.com) as well as from Volumio’s online shop.
There are currently four ways to get audio out of the RPi:
According to several sources on the Net, this is the pin out:
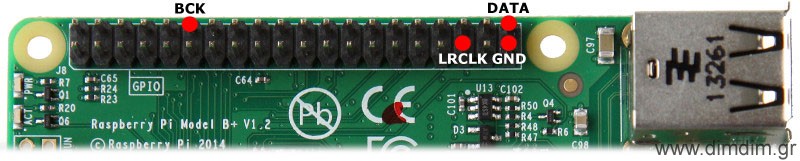
You will probably notice that the RPi does not support MCLK output. This means in practice that your DAC will need to have its own on-board clock (or internal PLL / oscillator or whatever). We can live with that.
Luckily, my Buffalo III has its own clock (of course it does!) and thus can be connected quite easily. Let’s try that:
Now we have to configure the software for I2S output. For my distribution of choice, Archphile, it’s a piece of cake: http://archphile.org/howto/i2s-dacs-and-the-raspberry-pi/
Audio playback works just fine!
Well, almost fine..
You see, in theory the RPi has a bit of a problem with its I2S output. Since the only clock onboard the RPi is a 19.2MHz crystal, it should have trouble generating proper clocks for its I2S output. For example, for 44.1KHz audio, the LR Clock must be running at precisely 44.1KHz. That is not possible, since the frequency is not a multiple of 19.2MHz. Thus, the frequency can be either 19.200.000 / 435 = 44.138KHz or 19.200.000 / 436 = 44.0366KHz. This is a limitation of the Broadcom BCM2835 in conjunction with the 19.2MHz crystal and there is nothing that can be done.
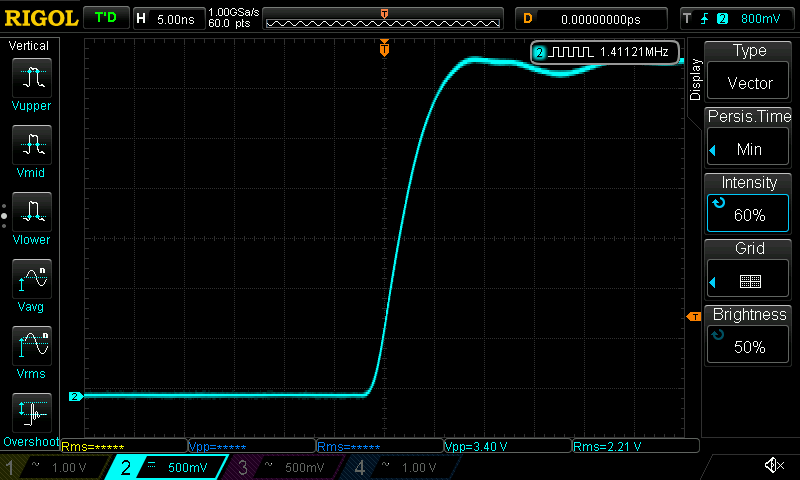
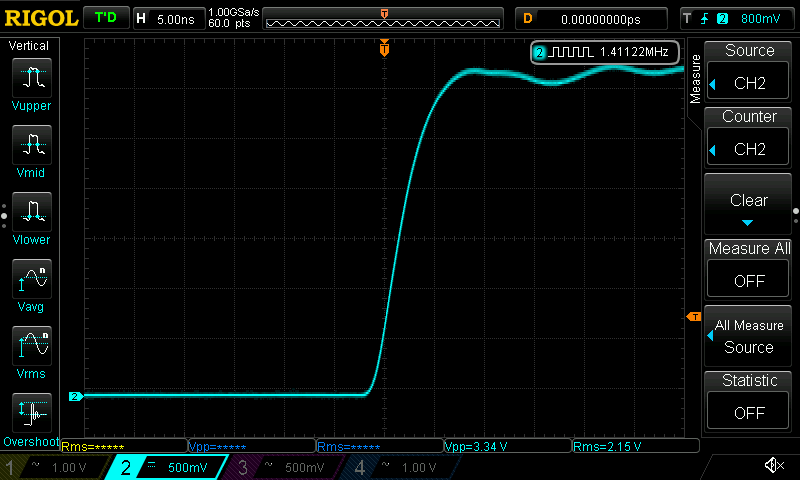
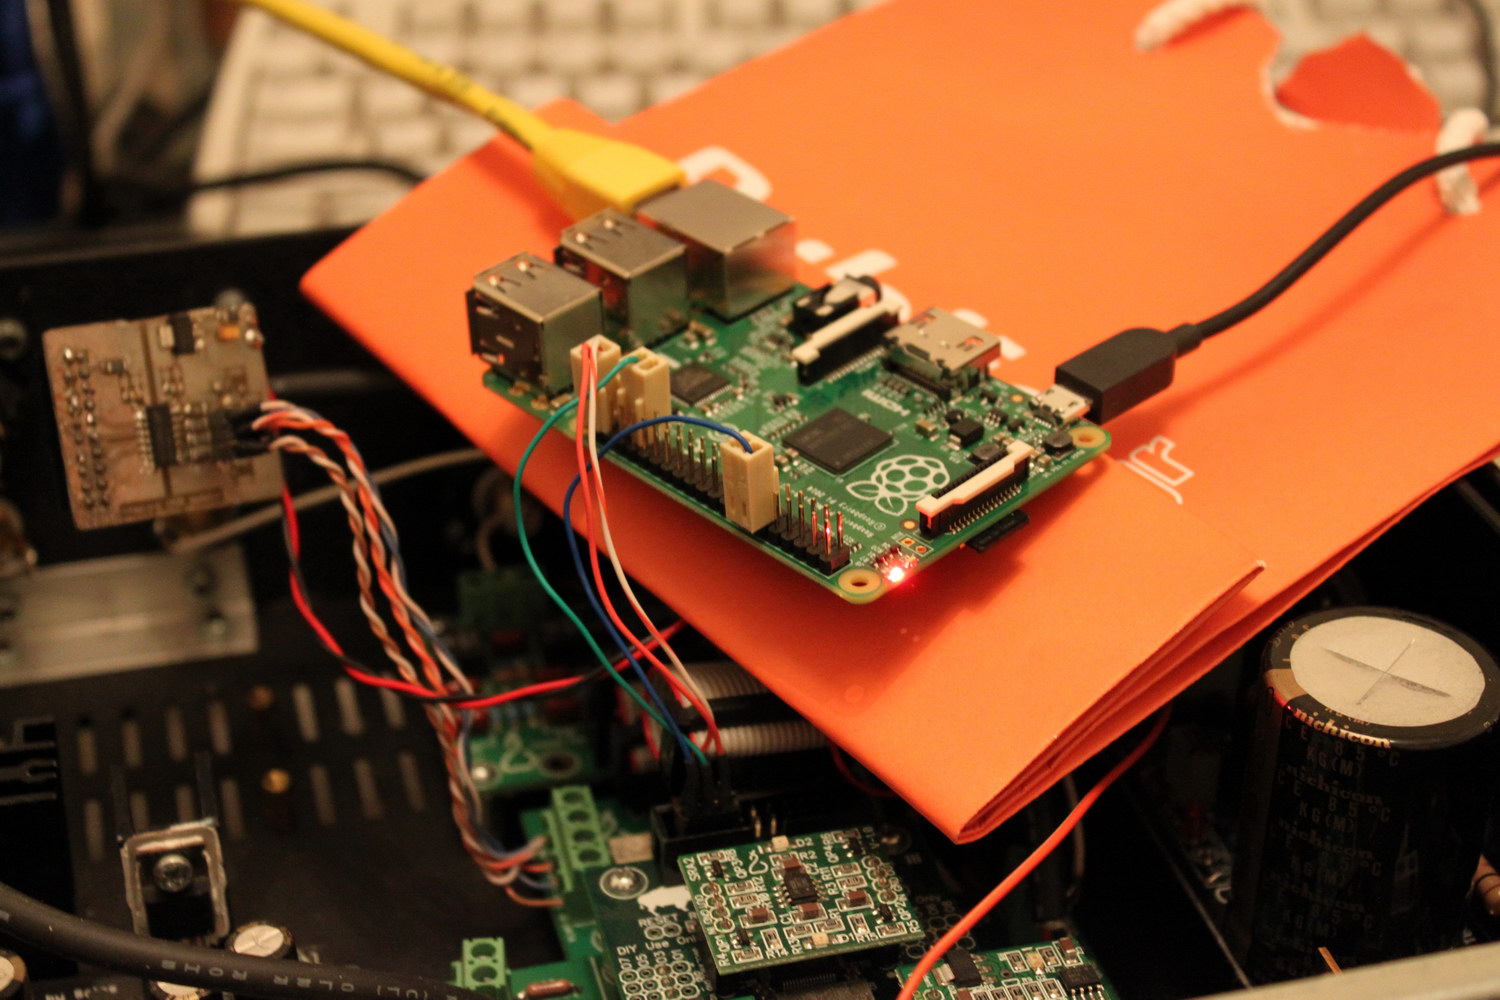
In order to confirm the theory, I decided to run a few tests. I hooked up my logic analyzer to my RPi, set it up for I2S output, and fed it some 44.1KHz music.
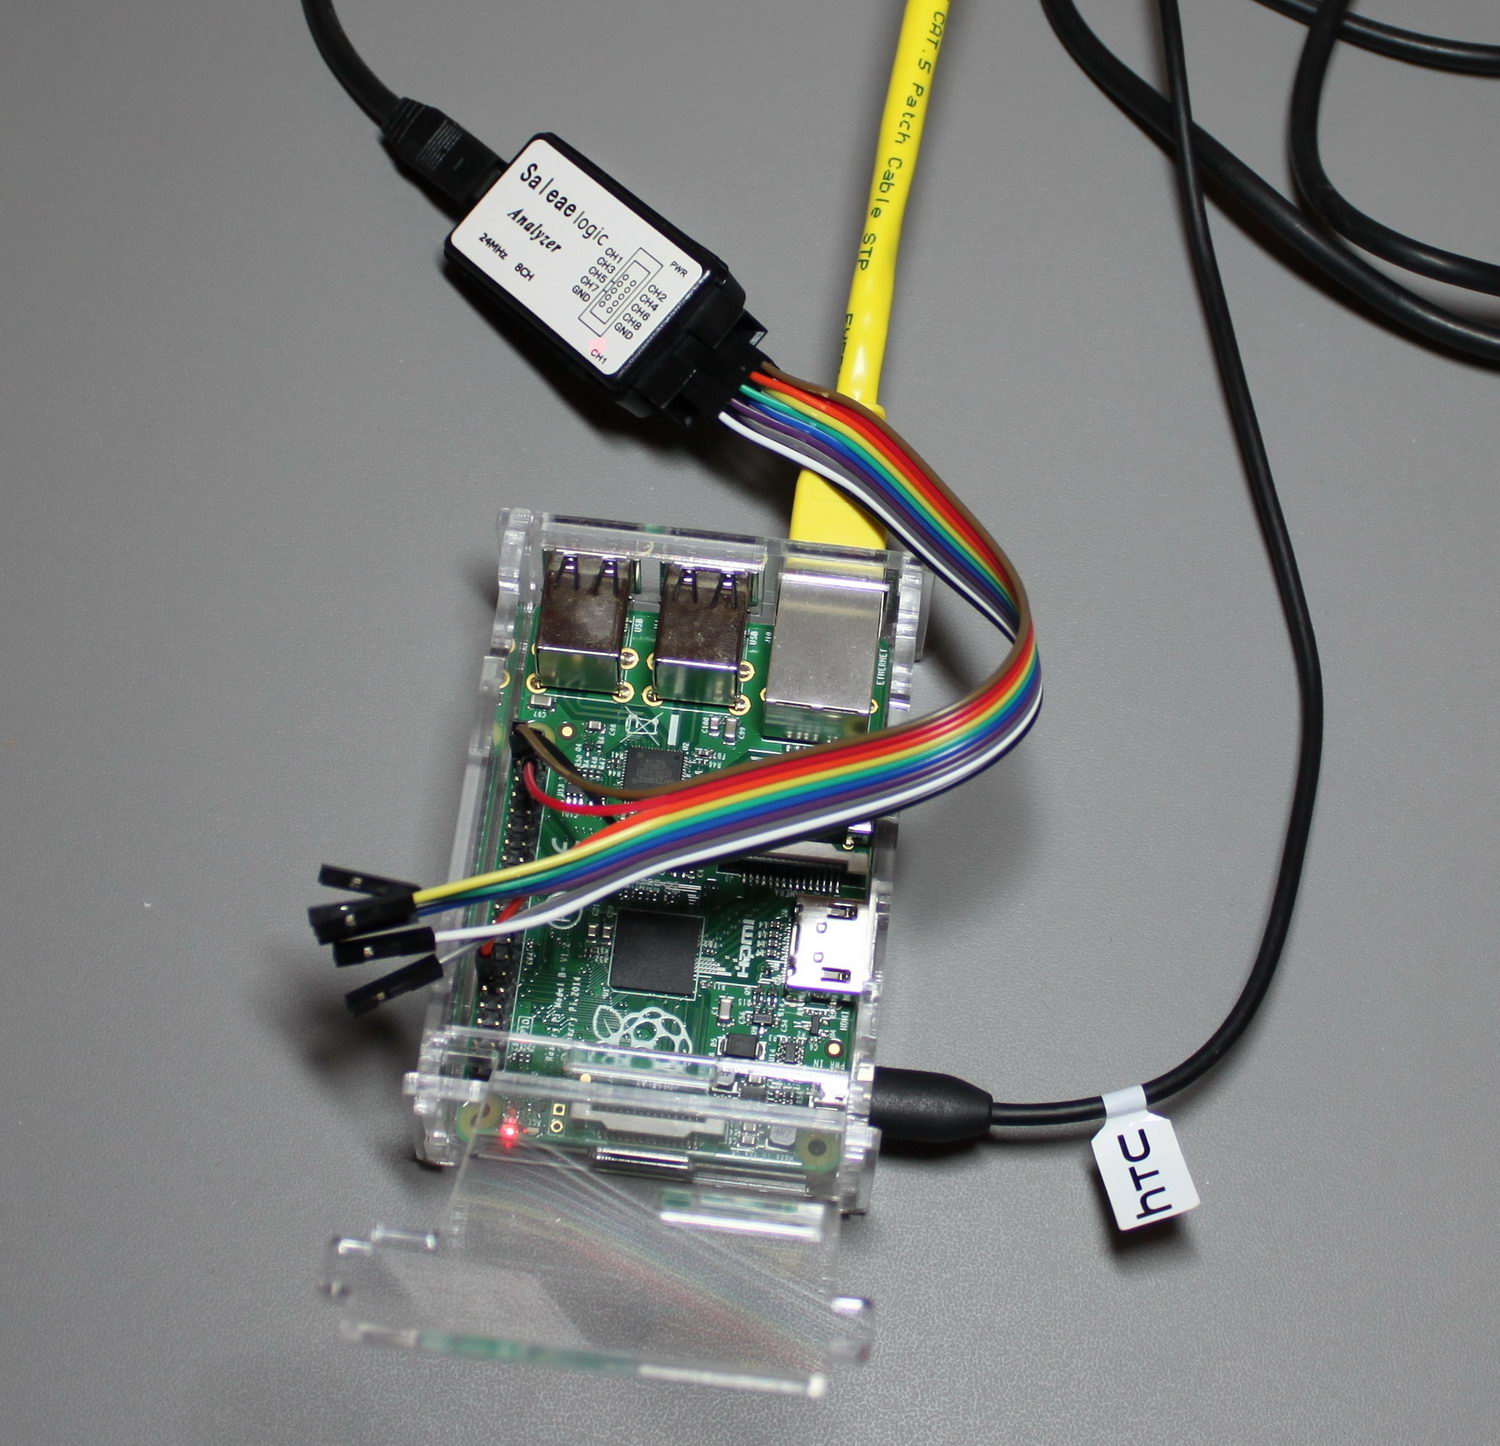
I took 1 sec worth of samples with my logic analyzer, configuring it for I2S signal. I got this:
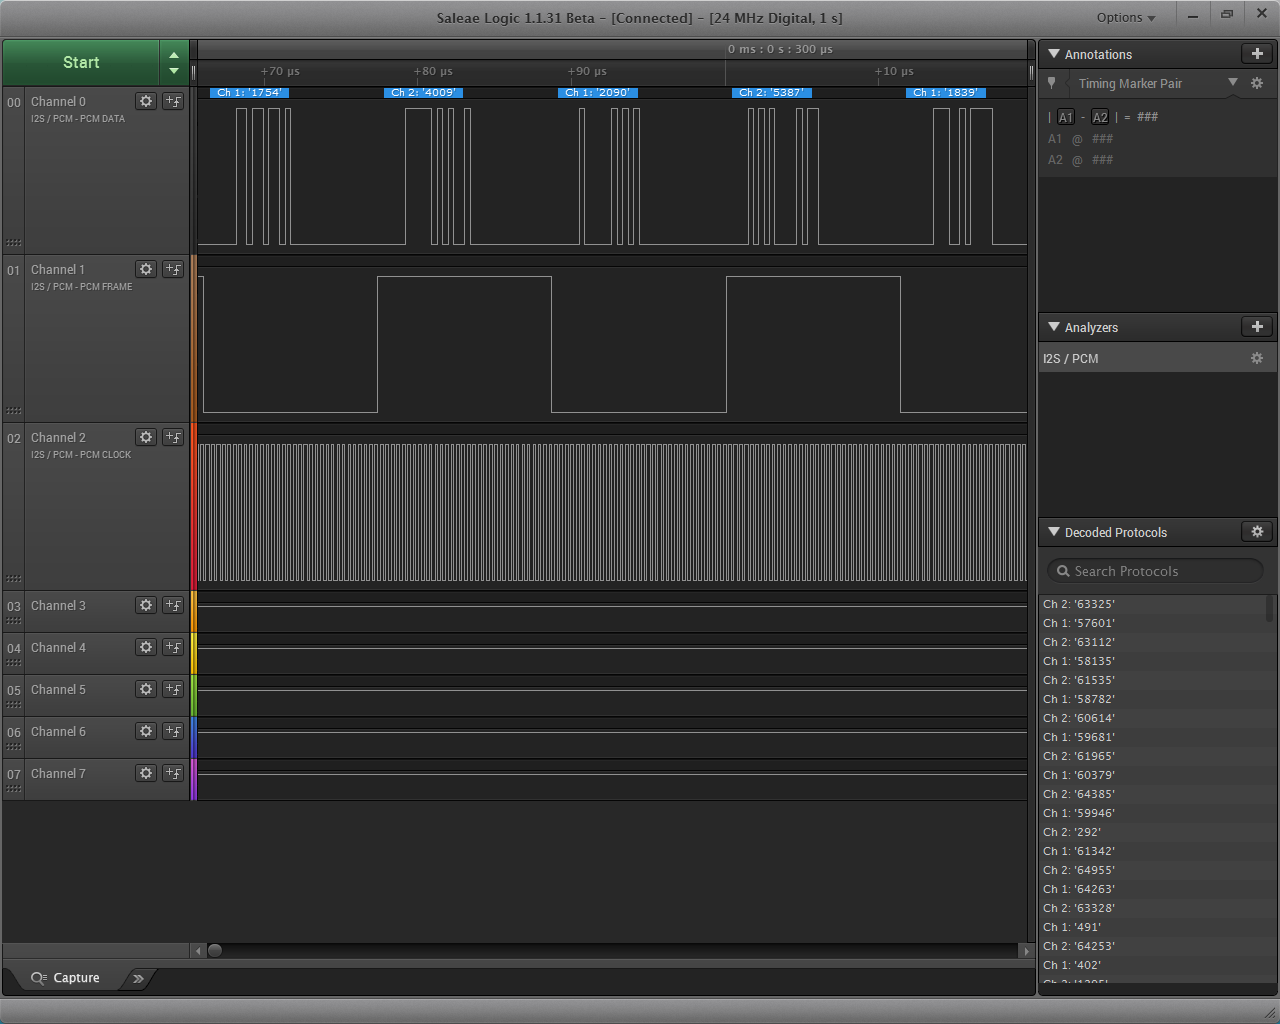
The PCM Clock is already appearing a little dodgy. Let’s zoom in:
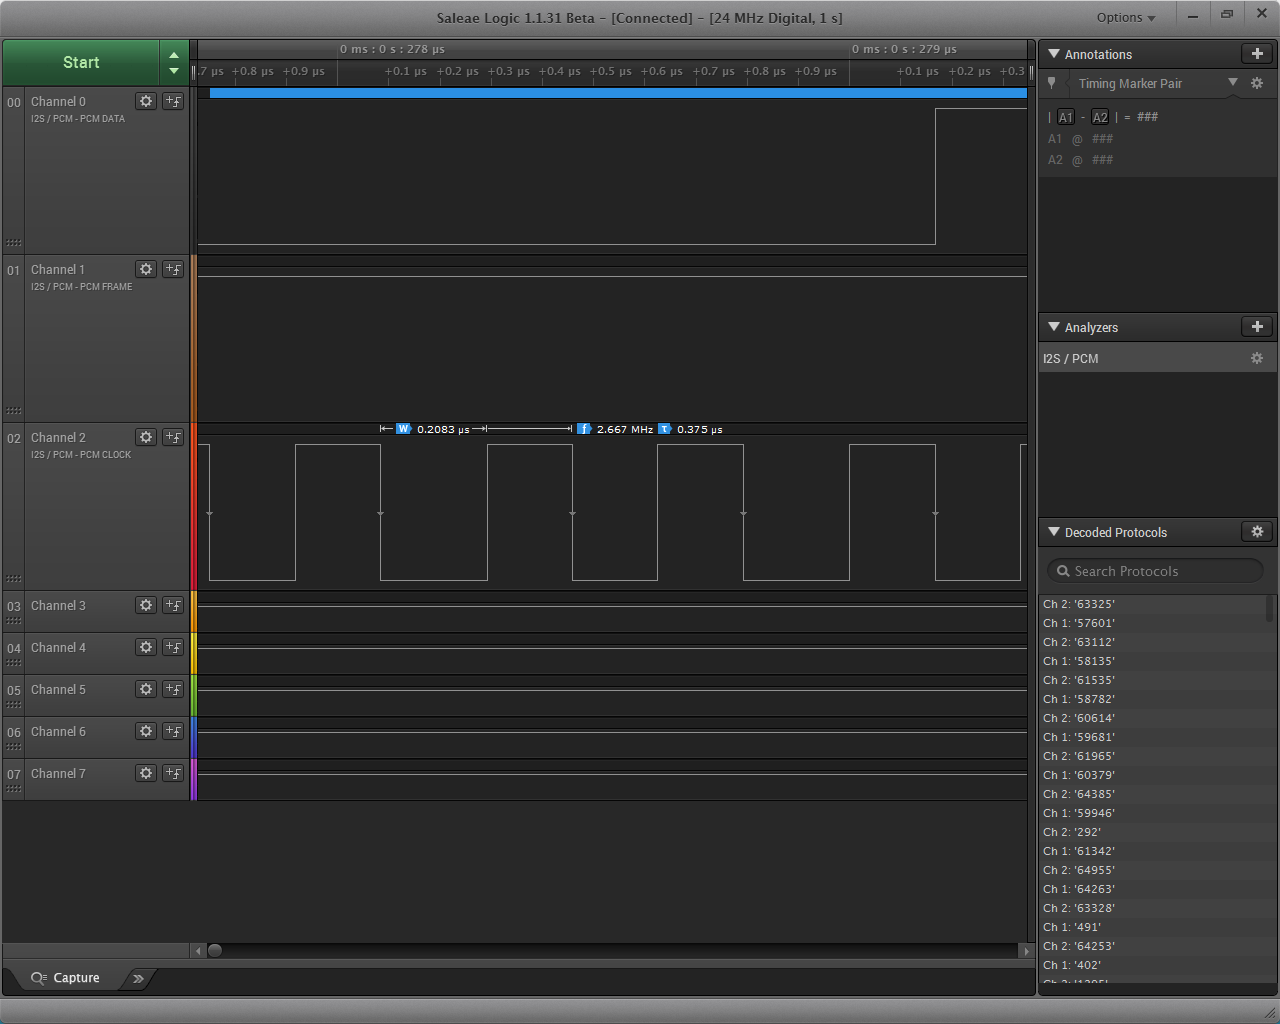
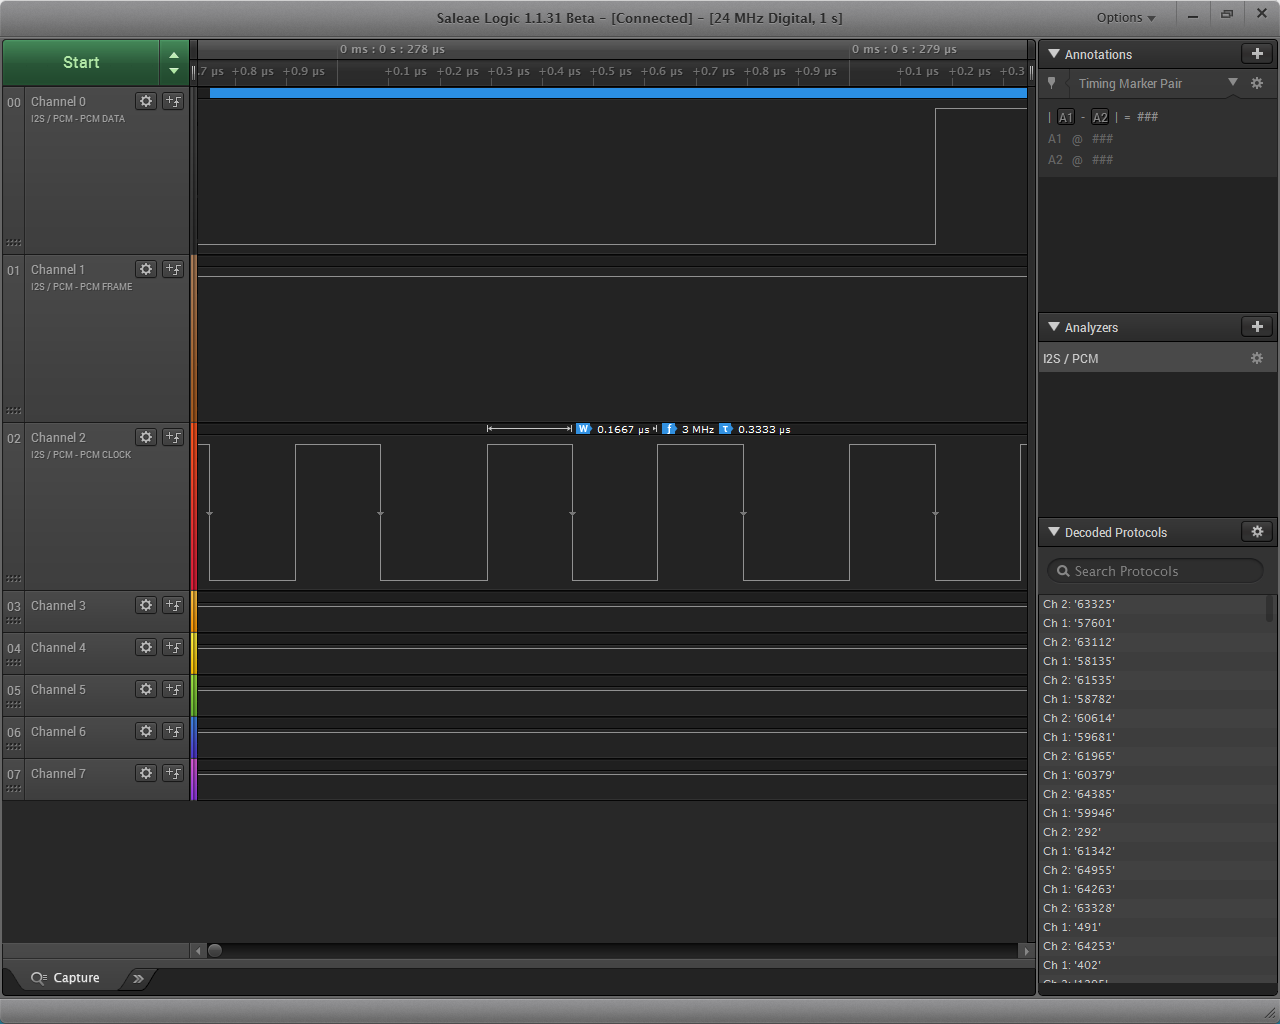
As you can see, the pulses do not have the same duration. They appear to alternate between two values. So it is obvious that the signal has jitter. A lot of jitter. Since we’re here, let’s have a look at the LR Clock signal as well:
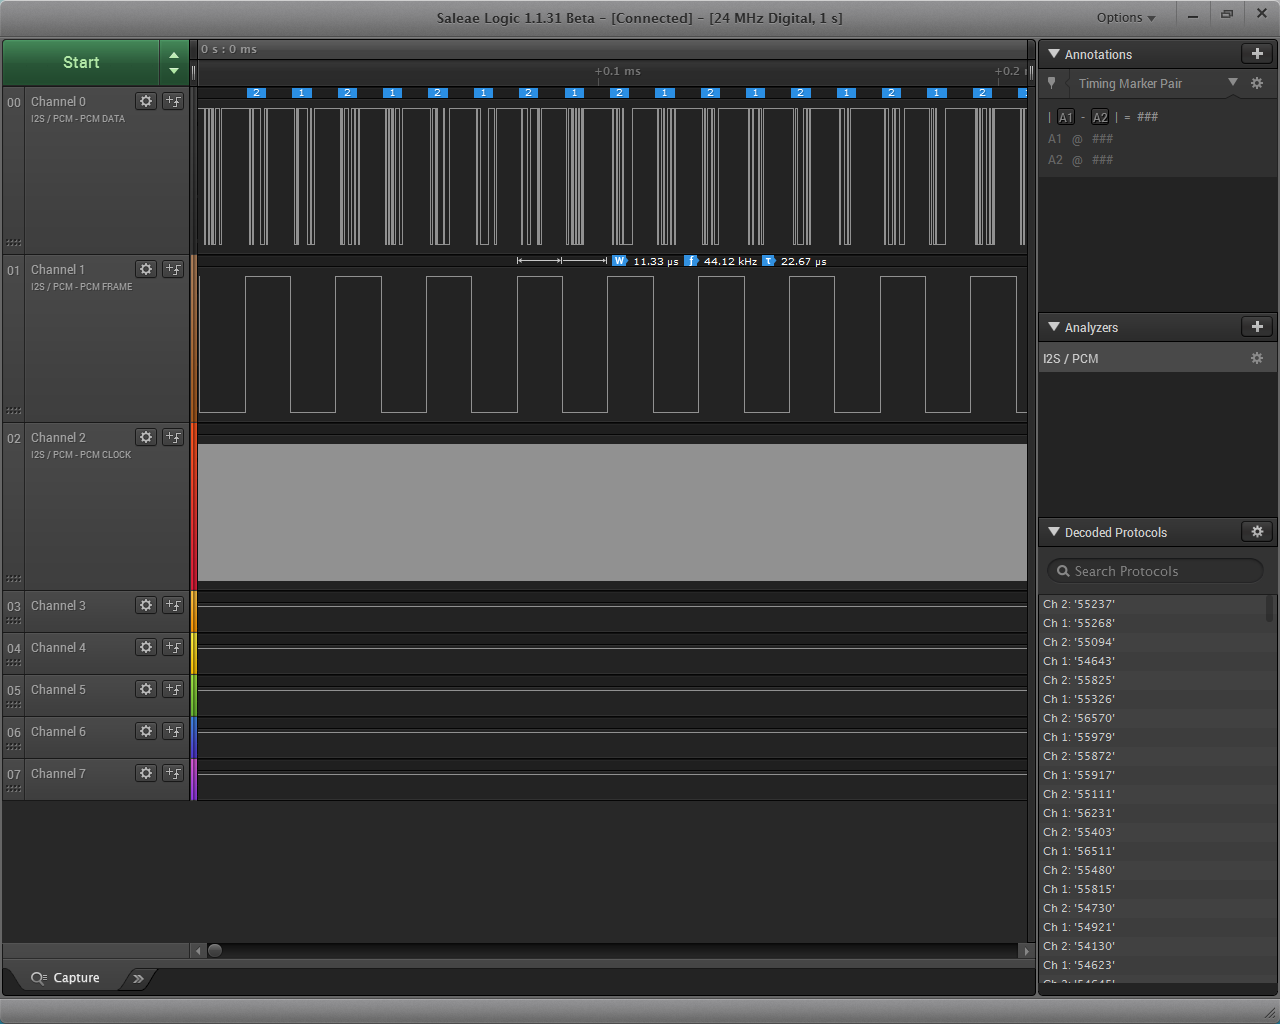
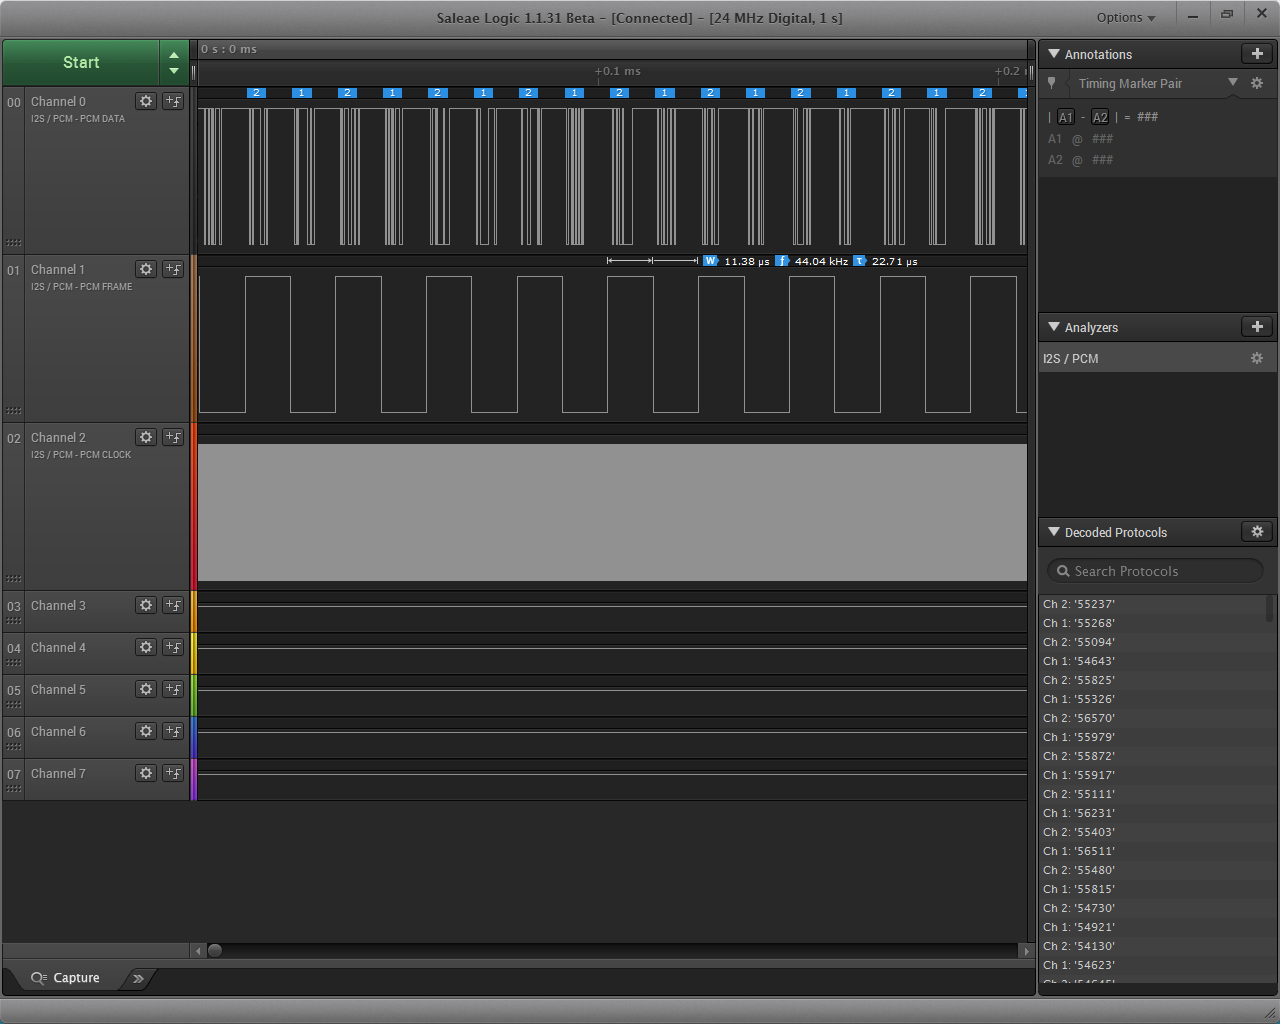
The duration of the pulses appears to alternate between 11.33μS and 11.38μS, giving respectively 44.12KHz and 44.04KHz, values very close to the ones I calculated previously.
So, the theory is sound and the RPi’s clock is not up to snuff by strict standards. What this means is that the RPi’s I2S output is not capable of “Hi End” audio transmission. It is essentially not bit perfect (edit: this is not correct, strictly speaking. It is in fact bit perfect, it is just not “proper”.).
In the real world, chances are that this problematic clocking will not be particularly audible under normal circumstances, say with a normal-specc’ed sound system. But an audiophile should definitely steer clear of the RPi’s I2S output, instead opting for a USB to I2S interface.