I love TFTs because one can make with them professional looking project displays without necessarily breaking the bank.
I am particularly fond of the SPI interface because it uses a minimum number of I/O pins. This means that since even a minimal Arduino (one based on an ATmega328) can drive a low-cost TFT with I/O left for other tasks, the cost may be kept down. Nowadays, it is realistic to implement a basic Arduino with a 2.2″ TFT for less than 10€. An ATmega328 with an Arduino bootloader goes for 1,50€ on Ebay, a 2.2″ SPI TFT goes for about 3,50€, so “vintage” character LCDs are definitely on their way out.
So, let’s get down to business. What does one need in order to get one of these displays to work?
Obviously, you need the TFT display itself. I don’t care where you buy it from – you may get it from Adafruit or SparkFun or iTead or any one of the “big name” shops or you may get it from Ebay (a.k.a. “China”). In my experience, it doesn’t really matter as long as you know what you are purchasing. For example, on Ebay when you search for 2.4″ SPI TFT LCD you will come across this:

and this:

They are essentially the same TFTs, but the first one is ~1€ cheaper than the second one. The difference is the PCB that is included. Do not underestimate this PCB. If you go for the plain TFT you will have to solder it to a suitable PCB like this one:
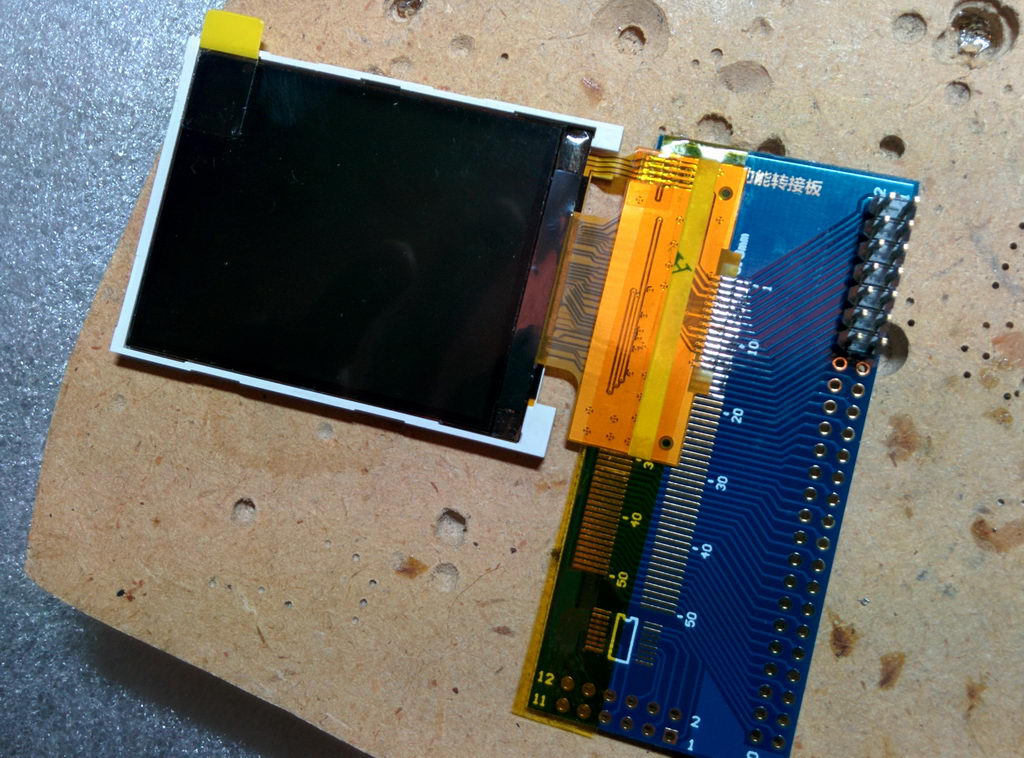
Sure, it is no herculean task, but the TFT + adapter will most likely cost more than a TFT pre-mounted on a PCB.
Rolling your own PCB is indeed an option, but IMHO it is not worth it, not unless you are planning to go into mass production. For 1 or 2 pieces just do yourself a favor and shell out the extra €. You won’t regret it.
But let’s backtrack just a bit. How does one select a TFT? Surely, one would think that size and resolution are the most important factors. I say sure, as long as you have the software part covered. In order to actually show stuff on a TFT you need an appropriate library. You should not take for granted that such a library indeed exists for that gorgeous hi-res IPS TFT that you found for 10€ on Ebay. Many sellers on Ebay just write the word “arduino” on the TFT’s description without giving it much serious thought. Plus you should expect zero (0) support from most Ebay sellers. Most of them can’t and won’t help you if you run into trouble with your code.
So, you should always do a little research. Google is your friend. A good start is Karlsen Henning’s UTFT library. Being billed as a Universal TFT Library it does indeed support a large number of TFT controllers. If your display’s controller is included in UTFT’s compatibility list, you are somewhat covered. I say somewhat because UTFT is not always the best choice since it has a pretty heavy footprint. It will consume the better part of an ATmega328’s flash memory capacity. Fortunately, there are other libraries out there. I will go into more detail later on.
So, you got a TFT and are faced with the task of hooking it up to the Arduino. Relax, it’s simple. You only need to connect 4 or 5 wires, plus power and GND. Let’s start with the basics.
1) Power (Vcc). Most displays need 3.3V to function. This is a requirement of the TFT panel itself as well as of the driver IC that is always part of the assembly (it is an embedded part – you can not really see it). But as you probably know, most Arduinos run on 5V. Display manufacturers that make products for Arduino of course know that and usually include an on-board regulator that takes 5V as input and gives the necessary 3.3V. In most cases there is a selector on the PCB (jumper, solder bridge, or something) that lets you configure the board for 5 or 3.3 volt operation. Look out for that.
2) LED power. This pin controls the backlight of the TFT panel. It consists of a number of LEDs, depending on the size of the LCD panel. Bigger panel means more LEDs and thus more power consumption. It is usually connected to GND or to 5V/3.3V. Some times a current limiting resistor is also necessary. Other times the resistor is built-in and so is a mosfet that allows you to adjust the LED backlight’s brightness by connecting it to a pin that supports PWM (some of the more expensive TFTs support this). In any case, read the manual. You may come across a Chinese TFT that you had to have but then noticed that it has sparse if any documentation. If this happens, play it safe by connecting the LED pin to GND through a resistor (a few hundred ohms is usually a good starting point). If it lights, it means that the polarity is OK. If it does not, try applying 5 or 3.3V to it (through the resistor). If it lights but is too dim, use a smaller resistor. Usually each LED draws about 10-15mA, so if you know how many LEDs your TFT uses you can estimate its power draw and thus select a proper resistor.
3) Signalling. This is the nice part about using SPI: you only need 4 or 5 wires.
CLK (or SCLK / SCK): This is the clock input pin.
MOSI (or SDI / SDA): This is the Master Out Slave In pin. The actual raw data that is sent to the TFT passes through this wire.
CS (or TFT_CS or LCD-CS): This is the chip select pin.
D/C (or A0 or RS): This is the Data or Command selector pin.
We also have the Reset pin. Some times you can get away with connecting it to the Arduino’s reset pin, but it is better to connect it to a normal pin in order to have better control over it.
A special note here: Signalling is usually done at 3.3V unless the TFT’s manufacturer has implemented some kind of level shifting on board the PCB. This level shifting may be done by an IC (best case), or a bunch of transistors and resistors (fair enough..) or just 1.2K resistors (a bit of a kludge, but it usually works). It is important to be careful not to send 5V into a TFT that only supports 3.3V logic because in that case you will most likely damage the TFT.
At this point you need to take a break from the hardware and consider the software, since your choice of library will dictate the particulars of the next step, which is the connection of the signal wires to the Arduino.
Your main choices are two: the UTFT library and the Adafruit GFX library.
Each library has its strengths and weaknesses.
UTFT
Pros:
- Very nice text support, especially with the add-on UTFT_DLB. Any TrueType font can be converted into a UTFT font of any size with minimum effort.
- It is indeed universal. You only need to change one parameter in your code to support a different TFT. One library to rule them all, etc.
Cons:
- Memory consumption. Nice fonts come at a price. No big deal if you have a MEGA or DUE, but makes things pretty cramped in an ATmega328.
Adafruit GFX
Pros:
- Relatively small footprint.
Cons:
- Ugly (blocky) fonts if you scale them to a non-native size. This is being fixed by 3rd party code that now supports a small number of proportional fonts but is nowhere near as versatile as UTFT’s code.
You really should become familiar with both of them since different projects will steer you towards one or the other.
Depending on your choice of library, you may need to use the hardware SPI pins for CLK and MOSI or you may be free to use any pins you like. It really just depends on the library.
Each of the libraries uses a slightly different notation for the signal pins. I will try to sum things up in this table:
[table “” not found /]
You may notice that most libraries say that you can just connect the TFT Reset pin to the Arduino Reset Pin. If you do that, you should put 0 as the reset pin.
Good luck!